
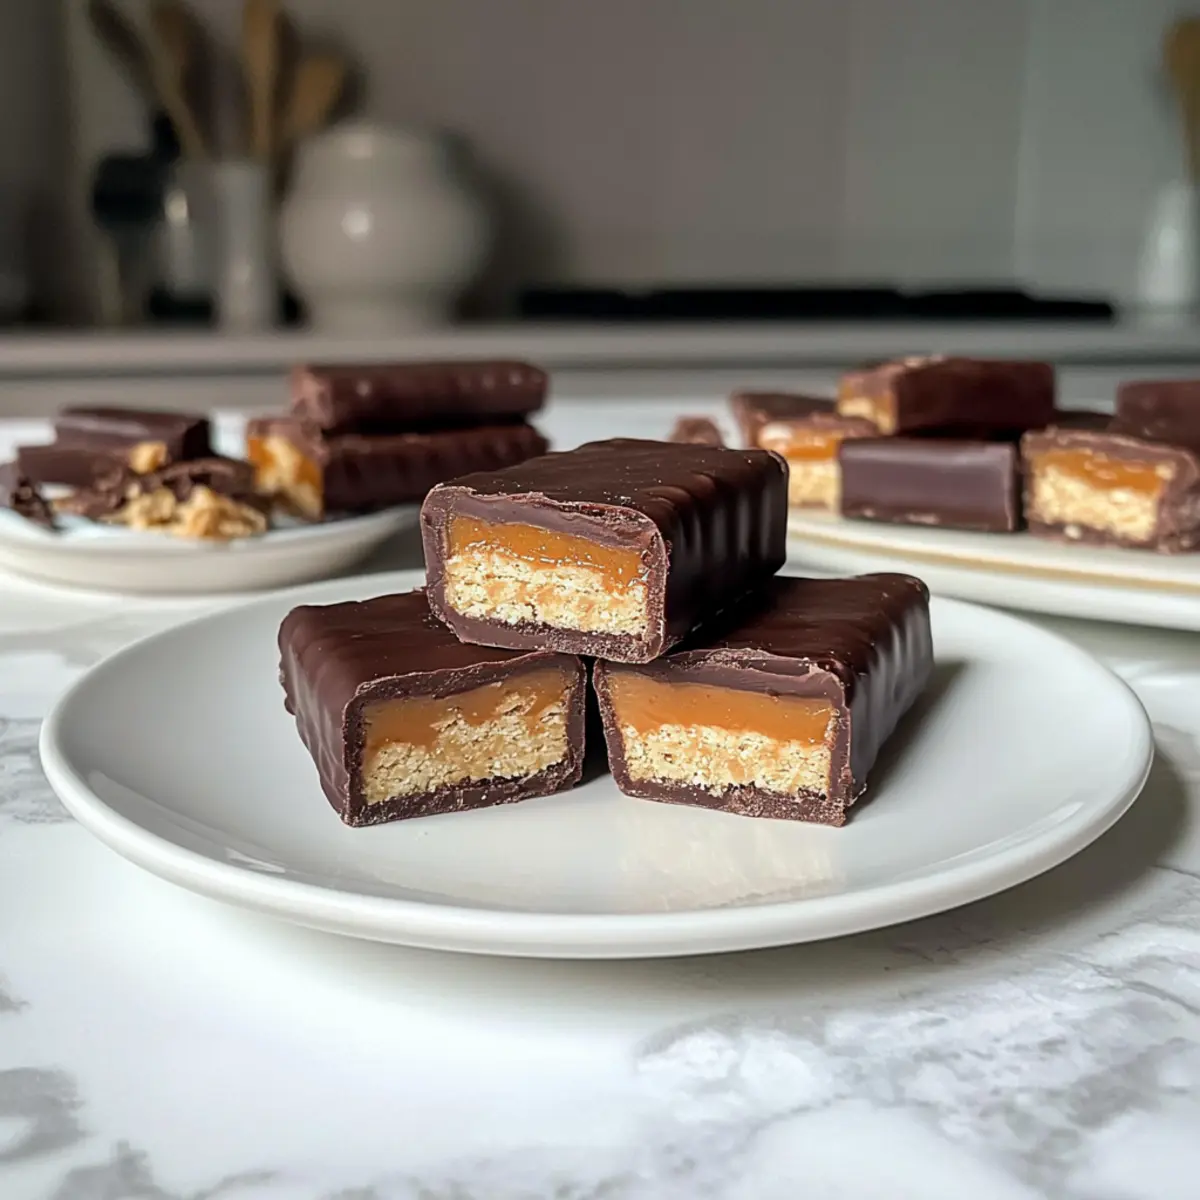
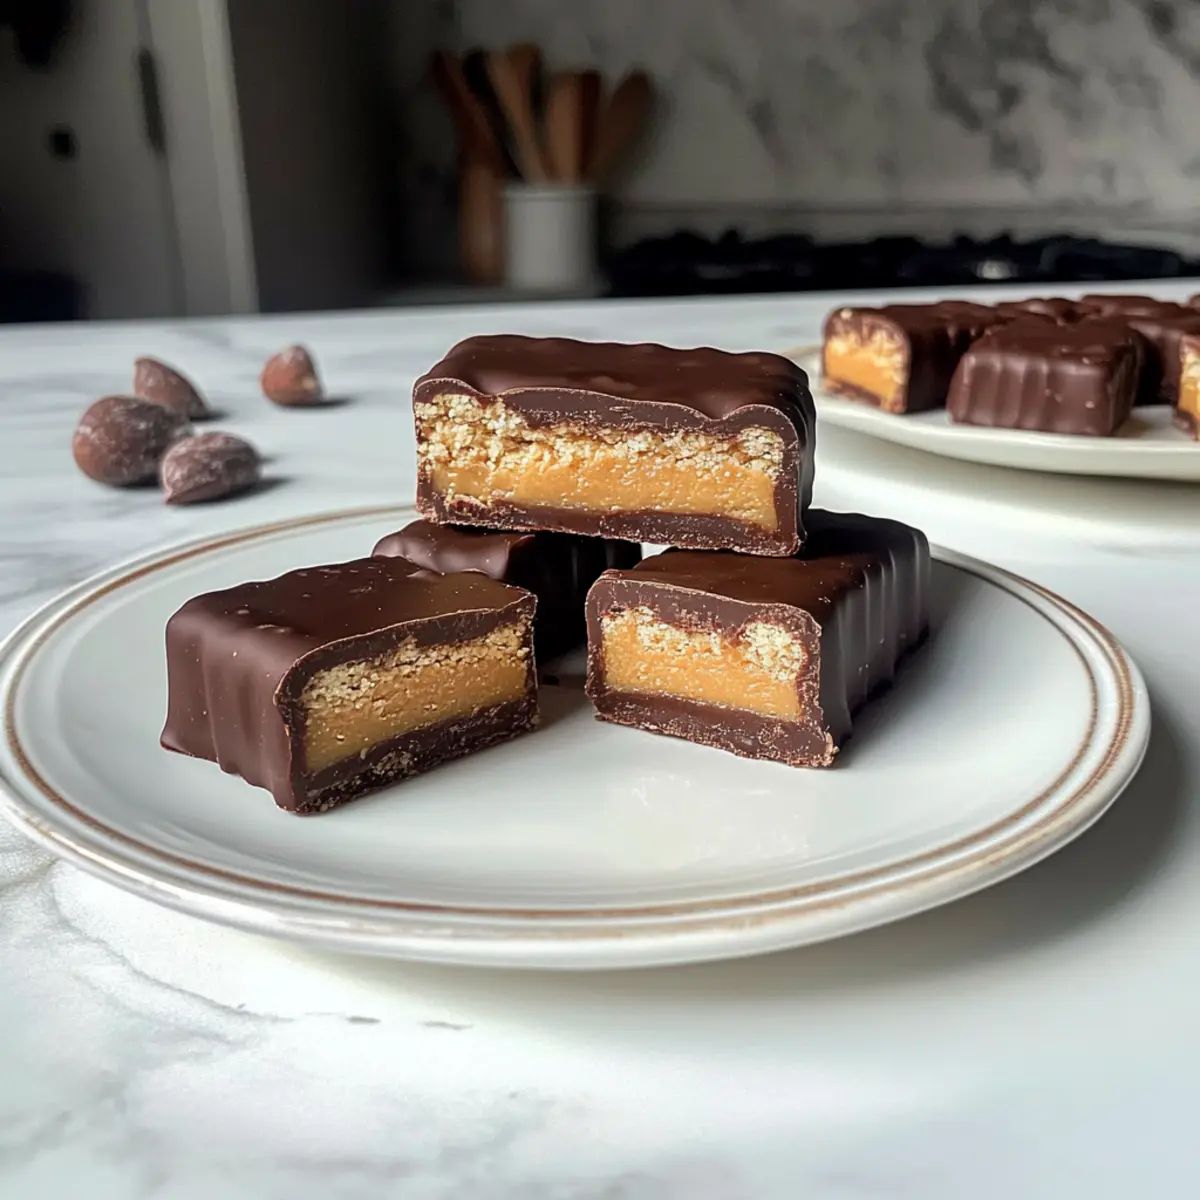
In the midst of dessert cravings, I found myself longing for something familiar yet healthier. These Healthy Twix Bars emerged as the perfect solution, featuring a delightful almond flour base, a velvety peanut butter caramel, and a luscious dark chocolate coating. Not only do they satisfy the sweet tooth, but they also powerfully align with my commitment to healthier eating. The best part? They’re incredibly easy to whip up, making them a go-to snack—or indulgent dessert—without any guilt. Plus, with options for gluten-free or vegan variations, everyone can enjoy this homemade treat. Curious how to make these inviting bars that balance health and decadence? Let’s dive into the recipe!
Why make Healthy Twix Bars at home?
Satisfying crunch: The almond flour base brings an irresistible texture that’s both light and filling.
Decadently creamy: Enjoy the rich, velvety peanut butter caramel layer that’s a luscious nod to classic treats.
Quick and easy: Whip these bars up in no time—perfect for satisfying sweet cravings without the hassle.
Versatile options: Customize them with various ingredients, like swapping peanut butter for almond butter or trying oat flour for a gluten-free version.
Lower in sugar: Indulge guilt-free, as these bars are a healthier alternative to traditional candy. Pair them with a hot cup of coffee for the ultimate snack, or explore more delightful recipes like Oatmeal Crumble Bars to keep your sweet tooth satisfied!
Healthy Twix Bars Ingredients
For the Base
- Almond Flour – A fantastic gluten-free option that adds structure and a delightful nutty flavor, perfect for Healthy Twix Bars.
- Butter – Gives a rich taste; swap with coconut oil for a dairy-free alternative.
- Maple Syrup – Serves as a natural sweetener and binder; can be replaced with honey or agave syrup for a different sweetness.
- Vanilla Extract – Enhances the overall flavor of the bars; consider almond extract for a unique twist.
- Salt – Balances the sweetness and can be any type, but sea salt is a great choice.
For the Caramel Filling
- Creamy Peanut Butter – The heart of the caramel layer, delivering creamy richness; almond butter or tahini makes a tasty substitute.
For the Chocolate Coating
- Chocolate Chips – Use dark chocolate or dairy-free chocolate chips to keep it vegan-friendly.
- Coconut Oil – Ensures the chocolate melts smoothly; feel free to use butter or avocado oil if preferred.
These ingredients will guide you in creating Healthy Twix Bars that are not only delicious but also a healthier dessert option. Enjoy making these delightful treats!
Step‑by‑Step Instructions for Healthy Twix Bars
Step 1: Preheat the Oven
Begin by preheating your oven to 350°F (175°C). While the oven heats up, take an 8×8 inch baking pan and line it with parchment paper, ensuring it extends over the edges for easy removal later. This will create a perfect base for the Healthy Twix Bars, as the even heat will help achieve a wonderfully golden crust.
Step 2: Prepare the Shortbread Base
In a large mixing bowl, combine almond flour, melted butter, maple syrup, vanilla extract, and a pinch of salt. Mix these ingredients until they form a cohesive dough. Once combined, press the mixture firmly into the lined baking pan, ensuring it is even and compact. Bake in the preheated oven for about 10-12 minutes, or until the edges are golden brown. Allow it to cool completely.
Step 3: Make the Creamy Caramel Filling
In a medium bowl, combine creamy peanut butter, maple syrup, additional almond flour, and vanilla extract. Stir vigorously until the mixture is smooth and well integrated. Once your shortbread base has cooled, spread the decadent caramel filling evenly over the shortbread layer. To help set the layers, place the pan in the freezer and chill for about 1 hour.
Step 4: Prepare the Chocolate Coating
While the caramel is setting, melt the chocolate chips and coconut oil. Use a double boiler for optimal control or microwave them in short intervals, stirring between each until smooth and glossy. This rich chocolate will create a luscious coating that envelops your Healthy Twix Bars in sweetness, so ensure it’s well combined and fully melted before proceeding.
Step 5: Assemble the Healthy Twix Bars
After the caramel layer has firmed up, remove the pan from the freezer. Carefully lift the chilled bars from the pan using the parchment paper. Cut the caramel layer into 16 equal bars. Dip each bar gently into the melted chocolate, ensuring every side is coated, then tap off any excess chocolate. Place them on a fresh parchment-lined tray to prevent sticking.
Step 6: Add the Final Touch
Once all bars are coated, drizzle any remaining melted chocolate over the top for an elegant finish. To elevate the flavor, sprinkle with a pinch of flaky sea salt. Finally, return the tray to the freezer for another 10 minutes, allowing the chocolate to harden completely around your delightful Healthy Twix Bars.

Expert Tips for Healthy Twix Bars
-
Press Firmly: Ensure you press the almond flour mixture into the pan firmly. This creates a solid base that won’t crumble when cut.
-
Chill Layers: Allow each layer to chill completely before adding the next. This keeps the distinct layers intact, enhancing the texture of your Healthy Twix Bars.
-
Quality Chocolate: Use high-quality dark chocolate (70% cocoa) for melting. It melts smoother and adds depth of flavor to your bars.
-
Vegan Substitutes: If going vegan, remember to substitute creamy peanut butter with almond butter or tahini, and use dairy-free chocolate chips for the coating.
-
Use Parchment Paper: Line your baking pan with parchment paper extending over the edges. It makes removing the bars easier and lessens cleanup!
Healthy Twix Bars Variations
Feel free to get creative with your Healthy Twix Bars by trying these delightful twists and swaps!
-
Vegan Delight: Replace creamy peanut butter with almond or cashew butter and use dairy-free chocolate chips for a fully vegan treat.
-
Gluten-Free Alternative: Swap almond flour for oat flour or a gluten-free blend to keep every bite wholesome and delicious. Remember, oat flour provides a fantastic texture!
-
Sweetness Adjustments: Use honey or date syrup as a substitute for maple syrup to customize the sweetness according to your preference.
-
Nut-Free Version: If you’re avoiding nuts, try substituting creamy peanut butter with sunflower seed butter. It gives a tasty twist while ensuring it’s allergy-friendly.
-
Taste of Coconut: For a tropical flavor, incorporate shredded coconut into the caramel filling. It adds a unique texture and sweetness that’s simply irresistible.
-
Extra Crunch: Add chopped nuts like pecans or walnuts to the almond flour base for a pleasing crunch. These will elevate the texture and introduce new layers of flavor.
-
Flavored Chocolate: Enhance the chocolate coating by mixing in a dash of espresso powder or cinnamon. This adds an exciting depth of flavor to every decadent bite.
-
Delicious Dipping: For added richness, dip your bars into white chocolate instead of dark. This lush twist offers a contrasting sweet profile that’s hard to resist.
Explore even more wholesome treats like Strawberry Cheesecake Protein balls or a side of Baked Parmesan Zucchini for a delightful meal pairing. The kitchen is your playground—have fun personalizing these bars!
What to Serve with Healthy Twix Bars
Satisfy your cravings for a delightful and well-rounded meal that pairs perfectly with these delectable treats!
- Fresh Berries: Bright, juicy berries like strawberries or blueberries add a refreshing touch that balances the sweetness of the bars.
- Greek Yogurt Parfait: Layered with honey and granola, this creamy creation complements the bars beautifully, offering a satisfying crunch.
- Nutty Granola: A side of lightly sweetened granola adds a delightful crunch, enhancing the textures of the bars while keeping everything wholesome.
- Vanilla Ice Cream: For a decadent dessert experience, serve with a scoop of creamy vanilla ice cream to elevate the treat’s indulgence.
- Herbal Tea: Pair with a soothing cup of chamomile or peppermint tea for a cozy afternoon snack that enhances the flavors.
- Coffee: Enjoying these bars with a piping hot cup of coffee brings out the rich chocolate notes, creating a perfect harmony of flavors.
Feel free to mix and match these pairings for a delightful snack or dessert experience that complements the wholesome joy of Healthy Twix Bars!
Make Ahead Options
These Healthy Twix Bars are perfect for busy home cooks looking to save time during the week! You can prepare the shortbread base and caramel filling up to 24 hours in advance; simply store them covered in the refrigerator to keep them fresh. The chocolate coating can also be melted ahead of time and stored at room temperature. When you’re ready to serve, cut the set caramel into bars and dip them in the premelted chocolate. Just be sure to allow the layers to chill completely before wrapping or stacking them to maintain their texture and quality. With these make-ahead strategies, you’ll enjoy delicious, guilt-free snacks ready whenever you need them!
How to Store and Freeze Healthy Twix Bars
Room Temperature: Keep your Healthy Twix Bars in a cool, dry place for up to 3 days in an airtight container to maintain their freshness.
Fridge: Store in the refrigerator for up to 2 weeks in an airtight container. This helps to preserve the texture and flavor while keeping them conveniently chilled.
Freezer: For long-term storage, wrap individual bars in plastic wrap and then place them in a freezer-safe container or bag. They can be frozen for up to 3 months.
Reheating: If desired, let the bars thaw at room temperature for about 15 minutes before enjoying. This helps restore their delightful texture and flavor.

Healthy Twix Bars Recipe FAQs
How do I select ripe ingredients for the Healthy Twix Bars?
Absolutely! While this recipe primarily uses shelf-stable ingredients, ensuring the freshness of your peanut butter is key. Opt for creamy peanut butter without additives and check for a smooth consistency. For sweets, using pure maple syrup enhances flavor and sweetness.
What’s the best way to store Healthy Twix Bars?
Very! To keep your Healthy Twix Bars fresh, store them in an airtight container in the refrigerator for up to 2 weeks. If you need them for longer, consider freezing them; they’ll maintain their taste and texture for up to 3 months.
Can I freeze Healthy Twix Bars?
Absolutely! To freeze them, wrap each bar individually in plastic wrap, ensuring they are tightly sealed to prevent freezer burn. Place them in a freezer-safe container or a zip-top bag. When you’re ready to enjoy, let them thaw at room temperature for about 15 minutes.
What if my layers don’t stick together?
No worries! If your caramel layer doesn’t stick, it could be due to the layer not being cold enough or the shortbread not being pressed firmly. To fix this, always allow layers to cool completely before adding the next. If needed, pop the bars back in the freezer for a short time to set the caramel before cutting.
Can I use substitutes for any of the ingredients due to allergies or diet?
Definitely! If you have dietary restrictions, you can swap ingredients in the Healthy Twix Bars recipe. Use almond or cashew butter instead of peanut butter for nut allergies. Coconut oil can be replaced with dairy-free butter for a creamy texture while maintaining a vegan-friendly option. If gluten is a concern, go ahead and use oat flour instead of almond flour.
Are these Healthy Twix Bars suitable for children or pets?
Yes, these bars are a delightful and healthier treat for kids, but keep an eye on portion sizes due to the natural sweeteners. However, avoid giving them to pets—especially chocolate, as it’s toxic to dogs and cats. Always double-check ingredients for potential allergens before sharing!
Healthy Twix Bars Recipe: Guilt-Free Sweet Indulgence
Ingredients
Equipment
Method
- Preheat your oven to 350°F (175°C) and line an 8x8 inch baking pan with parchment paper.
- Combine almond flour, melted butter, maple syrup, vanilla extract, and a pinch of salt in a mixing bowl to form a cohesive dough, then press into the lined pan.
- Bake for 10-12 minutes until edges are golden brown and let cool completely.
- In a medium bowl, mix creamy peanut butter, maple syrup, additional almond flour, and vanilla extract until smooth and spread on the cooled crust.
- Freeze for about 1 hour to set the caramel layer.
- Melt chocolate chips and coconut oil together until smooth, then coat the chilled bars and place on a parchment-lined tray.
- Drizzle leftover melted chocolate and sprinkle with flaky sea salt, then freeze for another 10 minutes to harden.
Leave a Reply