
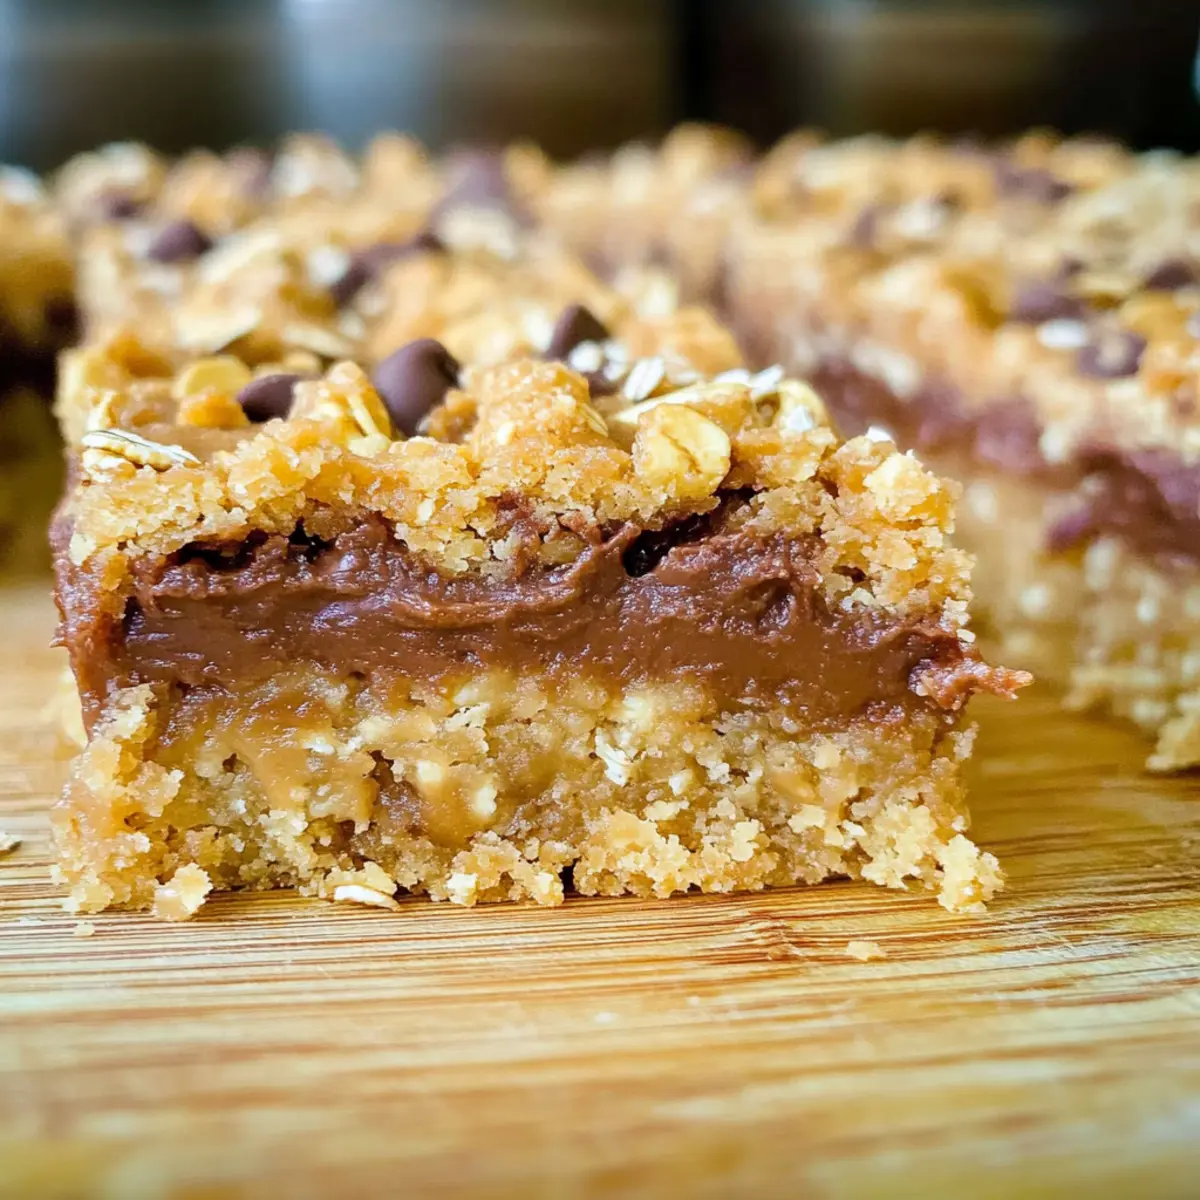
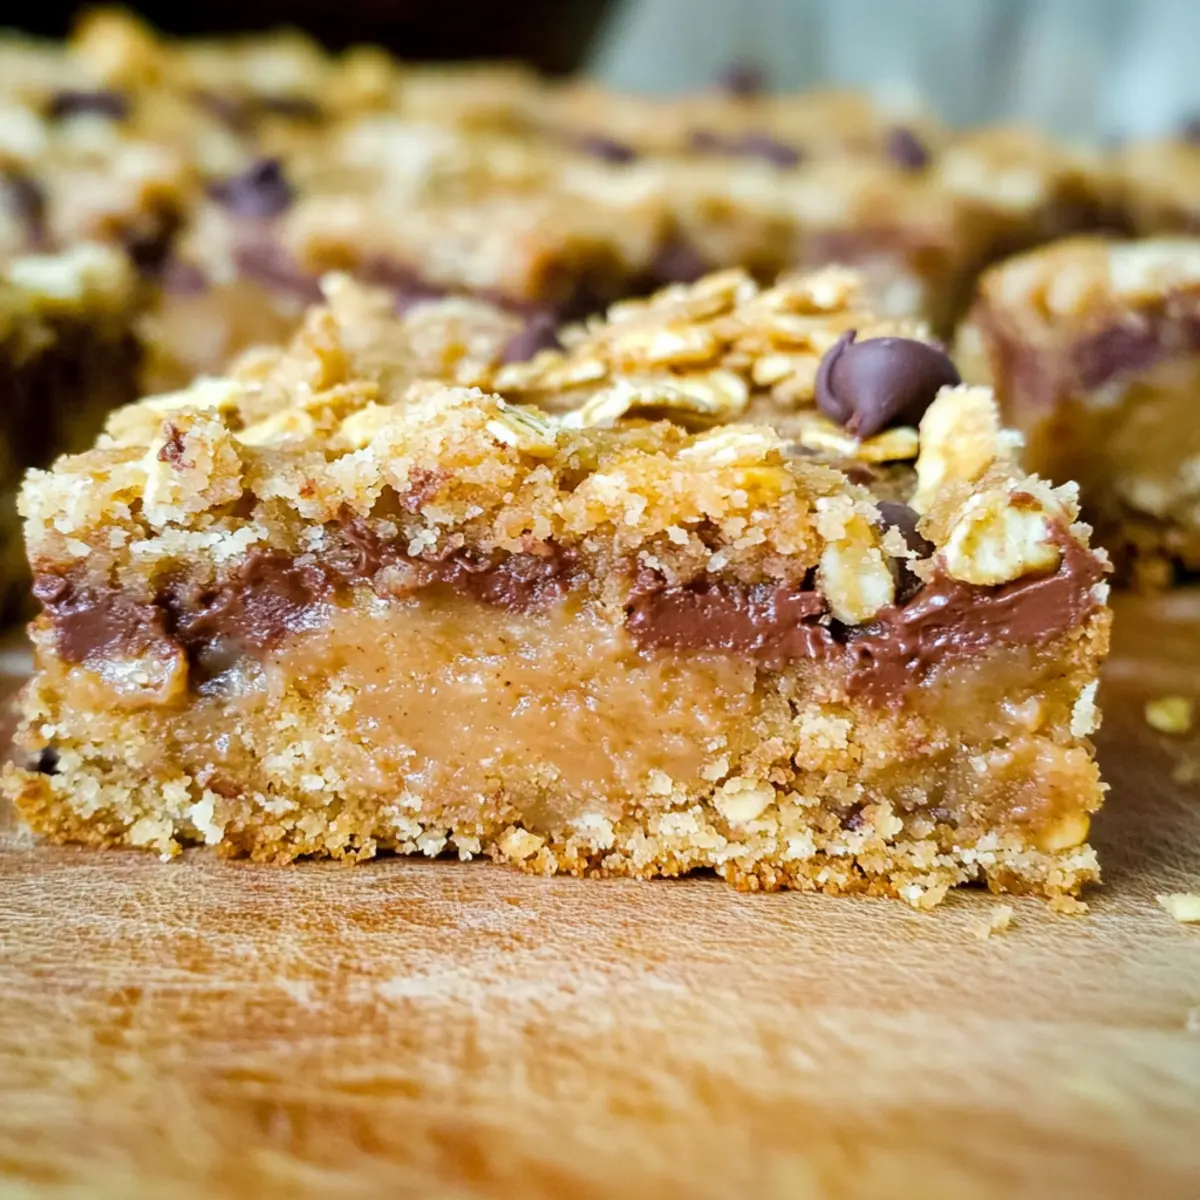
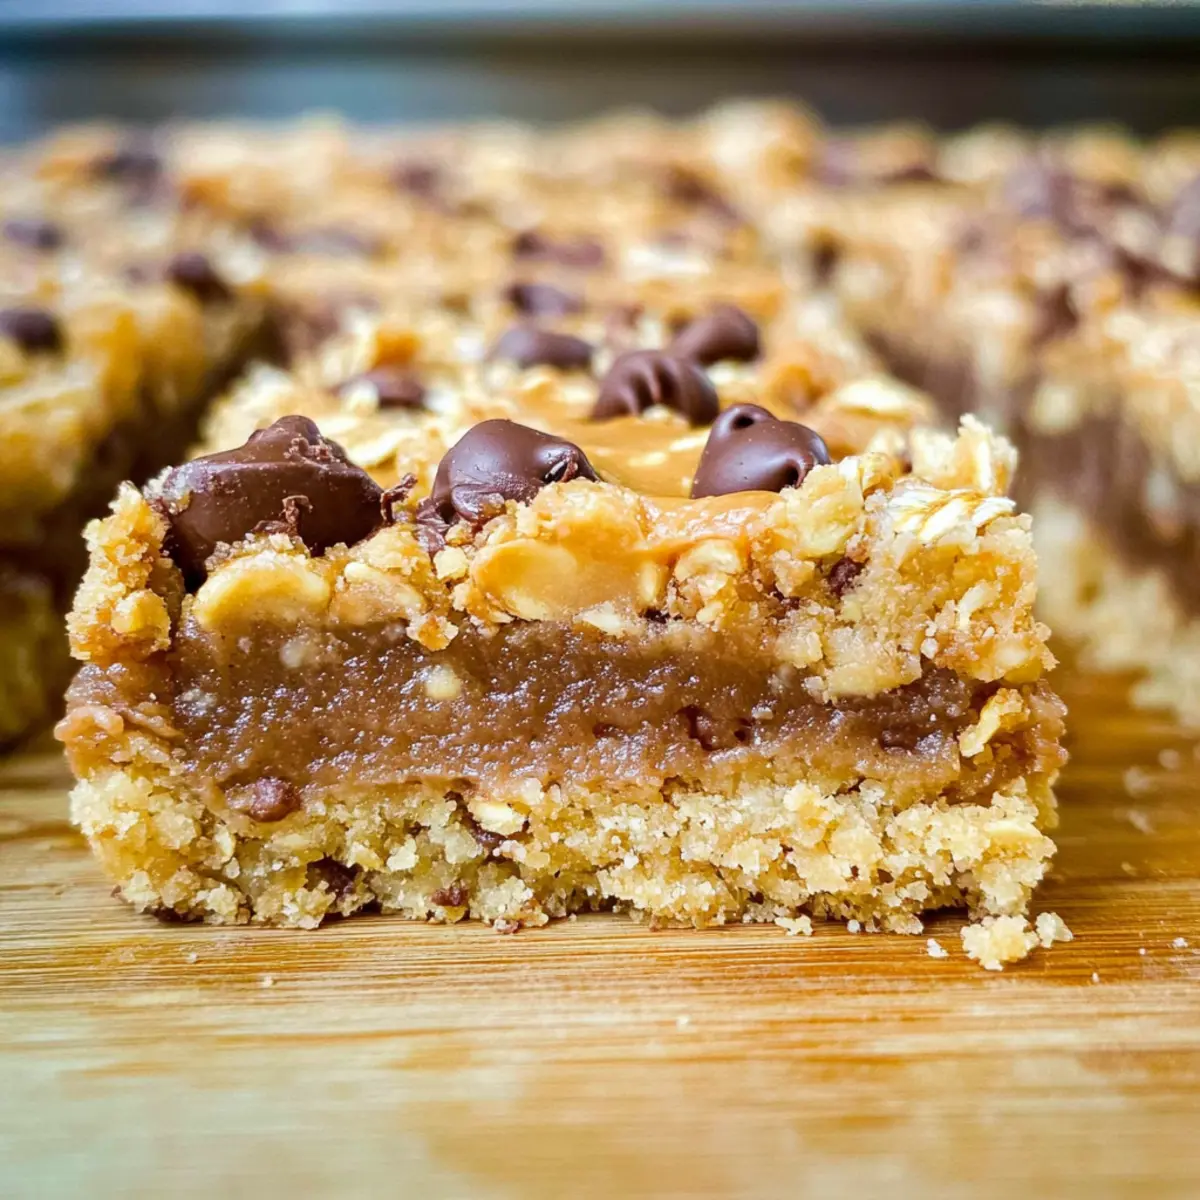
The scent of warm, freshly baked bars wafted through my kitchen, instantly whisking me back to carefree afternoons spent savoring sweet treats. Today, I’m excited to share my recipe for Peanut Butter Passion Bars—a perfect fusion of crunchy oat crust and a creamy, dreamy peanut butter filling that’s somehow both indulgent and comforting. Aside from being incredibly delicious, these bars are also quick to prepare, making them a fantastic last-minute dessert option for any gathering. Plus, they’re vegetarian-friendly, so everyone can enjoy them! What’s not to love about a dessert that satisfies your sweet tooth while being simple enough to whip up whenever the craving strikes? Ready to uncover the secrets to creating these delightful bars? Let’s dive in!

Why are Peanut Butter Passion Bars a Must-Try?
Indulgent flavors: These bars are a heavenly blend of creamy peanut butter and sweet chocolate chips, making every bite a delight!
Quick prep: You can whip these up in no time—ideal for those unexpected sweet cravings or potlucks where you want to impress without the fuss.
Crowd-pleaser: Perfectly satisfying for both kids and adults, if you loved my Peanut Butter Chocolate recipe, you’ll adore these!
Versatile: Customize easily by adding nuts or fruit, ensuring you can make this treat your own. Whether you crave extra crunch or want a unique twist, the options are endless!
Comforting textures: With a crunchy oat crust and a creamy filling, they offer a delightful contrast that will keep you reaching for more!
Peanut Butter Passion Bars Ingredients
• Create your own sweet journey with these indulgent treats!
For the Crust
- All-Purpose Flour – Provides structure to the crust; can substitute with a gluten-free blend if desired.
- Old-Fashioned Oats – Adds texture and crunch to the crust; avoid instant oats for the best texture.
- Brown Sugar – Contributes sweetness and moisture to the crust; white sugar can be used if needed, but it may alter the flavor slightly.
- Salt – Enhances the overall flavors; use kosher salt for the best results.
- Baking Soda – Helps the mixture rise slightly, ensuring a better texture; no substitutes recommended.
- Butter (cubed, at room temperature) – Adds richness and moisture; can replace with coconut oil for a dairy-free version.
For the Filling
- Peanut Butter – Main flavor component that provides creaminess; almond or sunflower seed butter can be used as alternatives.
- Sweetened Condensed Milk – Adds creamy sweetness to the filling; evaporated milk will not work as a substitute.
- Vanilla Extract – Enhances the flavor profile; use pure vanilla extract for a more robust taste.
For the Topping
- Semi-Sweet Chocolate Chips – Creates a sweet topping that complements the peanut butter filling; dark chocolate chips can be used for a richer flavor.
Step‑by‑Step Instructions for Peanut Butter Passion Bars
Step 1: Preheat the Oven
Begin by preheating your oven to 350°F (175°C). While the oven warms up, grab a 9×13-inch baking dish and generously grease it with nonstick spray. This will help ensure that your Peanut Butter Passion Bars come out cleanly after baking.
Step 2: Mix the Crust Ingredients
In a large mixing bowl, combine the all-purpose flour, old-fashioned oats, brown sugar, salt, and baking soda. Mix these dry ingredients thoroughly. Next, add the cubed butter and use your hands to work the mixture until it resembles coarse crumbs; this should take about 3-5 minutes, and the mixture should be crumbly yet cohesive.
Step 3: Press the Crust into the Pan
Take about 1½ cups of the crumbly mixture and set it aside for later. Press the remaining mixture firmly into the bottom of your prepared baking dish, creating an even layer. Use your fingers or the back of a measuring cup to ensure it’s well-packed, as this will form a sturdy base for the Peanut Butter Passion Bars.
Step 4: Prepare the Peanut Butter Filling
In a separate bowl, combine the creamy peanut butter, sweetened condensed milk, and vanilla extract. Blend these ingredients together until smooth and creamy, which should take about 1-2 minutes. The mixture should be well combined, with no lumps remaining, and will act as the luscious filling for your bars.
Step 5: Layer the Filling
Carefully pour the peanut butter mixture over the pressed oat layer in the baking dish. With a spatula, spread it out evenly to cover the entire crust. This creamy layer is the star of the Peanut Butter Passion Bars, so make sure to distribute it well to capture its richness in every bite.
Step 6: Add the Topping
Sprinkle the semi-sweet chocolate chips generously over the top of the peanut butter mixture. This adds a delightful sweetness that complements the creamy filling. For an extra touch, you can lightly press the chocolate chips into the filling to ensure they bake evenly and meld into the bars.
Step 7: Crumble the Reserved Mixture
Now, take the reserved crumbly oat mixture and crumble it evenly over the chocolate chips. Gently press down to ensure it adheres to the peanut butter layer. This will create a beautiful texture contrast on your bars, giving them a lovely crunch once baked.
Step 8: Bake the Bars
Place the dish in the preheated oven and bake for about 30 minutes. You’ll know they are done when the edges turn a light golden brown and the center looks set. Keep an eye on them while baking to prevent over-browning, ensuring a perfect finish on your peanut butter delicacies.
Step 9: Cool and Slice
Once baked, remove the dish from the oven and allow the Peanut Butter Passion Bars to cool completely in the pan. This cooling step is essential for a clean cut. After about 1-2 hours, slice them into squares or bars and get ready to indulge in these rich, heavenly treats!
Expert Tips for Peanut Butter Passion Bars
-
Butter Temperature: Ensure the butter is at room temperature; cold butter may make mixing difficult and affect the bars’ texture.
-
Cooling Time: Allow the bars to cool completely before slicing; this prevents them from crumbling and helps achieve clean cuts.
-
Check Measurements: Double-check your ingredient quantities to avoid uneven baking; accuracy is key for perfect Peanut Butter Passion Bars.
-
Crust Patting: When pressing the crust into the pan, use a measuring cup to create an even and sturdy base for your bars.
-
Chocolate Chip Variation: Mix in different types of chocolate chips or nuts if desired for a unique flavor twist; personalization makes these bars even more special!
Make Ahead Options
These Peanut Butter Passion Bars are perfect for busy home cooks looking to save time! You can prepare the crust up to 24 hours in advance by mixing the dry ingredients and cubing the butter, then store it in an airtight container in the refrigerator to keep it fresh. The creamy peanut butter filling can also be made and stored for up to 3 days before assembling your bars. When you’re ready to enjoy your bars, simply spread the filling over the crust, add the toppings, and bake as directed. This way, you still get that delightful fresh-baked taste with minimal effort on the day of serving!
What to Serve with Indulgent Peanut Butter Passion Bars
These rich, creamy bars deserve companions that enhance their delightful sweetness and comforting texture.
-
Creamy Vanilla Ice Cream: A scoop adds a luscious, cold contrast that pairs beautifully with the warm, peanut buttery goodness.
-
Espresso or Coffee: A robust cup of coffee balances the sweetness, while the rich flavors enhance the indulgent experience.
-
Fresh Berries: Berries like strawberries or raspberries provide a refreshing, tart contrast, cutting through the richness of the bars.
-
Chocolate Drizzle: A simple drizzle of melted chocolate over the bars amplifies the chocolate flavor, creating a decadent presentation.
-
Caramel Sauce: Drizzling warm caramel sauce over the bars adds extra sweetness and a luscious texture, making each bite irresistible.
-
Chopped Nuts: Adding chopped peanuts or almonds offers a delightful crunch, enhancing the overall texture of the dessert.
-
Chilled Milk: A classic pairing, a glass of cold milk complements the flavors and adds a nostalgic touch to your treat!
These options will elevate your indulgent peanut butter passion bars into a scrumptious experience that will linger in your memory.
How to Store and Freeze Peanut Butter Passion Bars
Room Temperature: Store your Peanut Butter Passion Bars in an airtight container at room temperature for up to one week to maintain freshness and flavor.
Fridge: For an extended shelf life, keep the bars in the refrigerator. They can last up to two weeks, just ensure they’re stored in a sealed container to prevent drying out.
Freezer: If you’re looking to save some for later, wrap the bars individually in plastic wrap and place them in a freezer bag. They can be frozen for up to three months; simply thaw them in the refrigerator before enjoying.
Reheating: To bring back their delightful texture, you can warm the bars in the microwave for a few seconds. This will soften the peanut butter filling, making each bite even more comforting!
Peanut Butter Passion Bars Variations
Feel free to sprinkle your personal touch on these delightful bars with these fun variations!
-
Nutty Twist: Substitute almond butter for a new flavor profile while maintaining that creamy texture you love. This change brings a delightful nuttiness that pairs wonderfully with chocolate.
-
Fruit Fusion: Mix in some dried fruit like cranberries or raisins for a burst of sweetness and chewiness. The tang of the fruit plays perfectly against the richness of the filling.
-
Chocolate Drizzle: Drizzle melted white chocolate over the finished bars for a super sweet finish that looks beautiful and adds delicious creaminess. It’s a tasty way to elevate your presentation!
-
Add Crunch: Toss in chopped nuts like walnuts or pecans for a satisfying crunch throughout the bars. This can transform the texture entirely and make them feel even more indulgent.
-
Spice It Up: Add a sprinkle of cinnamon or nutmeg to the peanut butter filling for a warm, comforting spice that enhances the overall flavor. It’s a subtle change that makes a big impact during cooler months.
-
Decadent Layers: Create a layered version by alternating layers of peanut butter filling with melted chocolate for an extra dose of indulgence. Each bite becomes a delightful surprise filled with rich layers.
-
Gluten-Free: For a gluten-free version, simply swap all-purpose flour with a gluten-free blend and ensure all ingredients checked for gluten. Enjoy guilt-free indulgence!
-
Hot and Spicy: If you like a kick, consider adding a sprinkle of cayenne pepper or chili powder to the peanut butter mixture. It adds a surprising yet addictive heat that balances the sweetness perfectly.
For even more peanut butter deliciousness, try my Peanut Butter Chocolate or whip up these scrumptious Peanut Butter Energy balls for a nutritious snack option!
Peanut Butter Passion Bars Recipe FAQs
What kind of oats should I use for Peanut Butter Passion Bars?
For the best texture, use old-fashioned oats. Instant oats can lead to a different and less desirable texture for your bars, making them chewy instead of crunchy.
How should I store Peanut Butter Passion Bars?
Store the bars in an airtight container at room temperature for up to one week. For longer freshness, keep them in the refrigerator for up to two weeks, ensuring they’re sealed well to prevent drying out.
Can I freeze Peanut Butter Passion Bars?
Absolutely! To freeze them, wrap each bar individually in plastic wrap and place them in a freezer bag. They can be frozen for up to three months. When you’re ready to enjoy, simply thaw them in the refrigerator overnight.
What should I do if my bars are too crumbly after baking?
If the bars turn out too crumbly, this might be due to not enough moisture or over-baking. Ensure you’re measuring your ingredients accurately, and try adding a little more peanut butter or sweetened condensed milk next time for a creamier texture. Also, allow the bars to cool completely before slicing to help them hold together better.
Are Peanut Butter Passion Bars suitable for people with nut allergies?
These bars are made with peanut butter, making them unsuitable for those with nut allergies. However, you can safely use sunflower seed butter as an alternative, creating a nut-free version with a similar creamy texture.
Can I use different types of chocolate chips?
Definitely! You can customize your bars by using dark chocolate chips for a richer flavor or even white chocolate chips for a sweeter twist. Mixing different types will add a delightful depth to your Peanut Butter Passion Bars.
Decadent Peanut Butter Passion Bars That Will Satisfy Cravings
Ingredients
Equipment
Method
- Preheat your oven to 350°F (175°C) and grease a 9x13-inch baking dish with nonstick spray.
- In a large mixing bowl, combine the all-purpose flour, old-fashioned oats, brown sugar, salt, and baking soda.
- Add the cubed butter and mix until it resembles coarse crumbs, about 3-5 minutes.
- Press 1½ cups of the mixture into the bottom of the prepared baking dish to form a crust.
- In a separate bowl, combine the peanut butter, sweetened condensed milk, and vanilla extract until smooth.
- Pour the peanut butter mixture over the pressed oat layer and spread evenly.
- Sprinkle the chocolate chips over the filling and gently press them in.
- Crumble the reserved oat mixture over the chocolate chips, pressing gently.
- Bake for about 30 minutes until the edges are golden brown and the center is set.
- Cool completely in the pan for 1-2 hours before slicing into bars.
Leave a Reply