
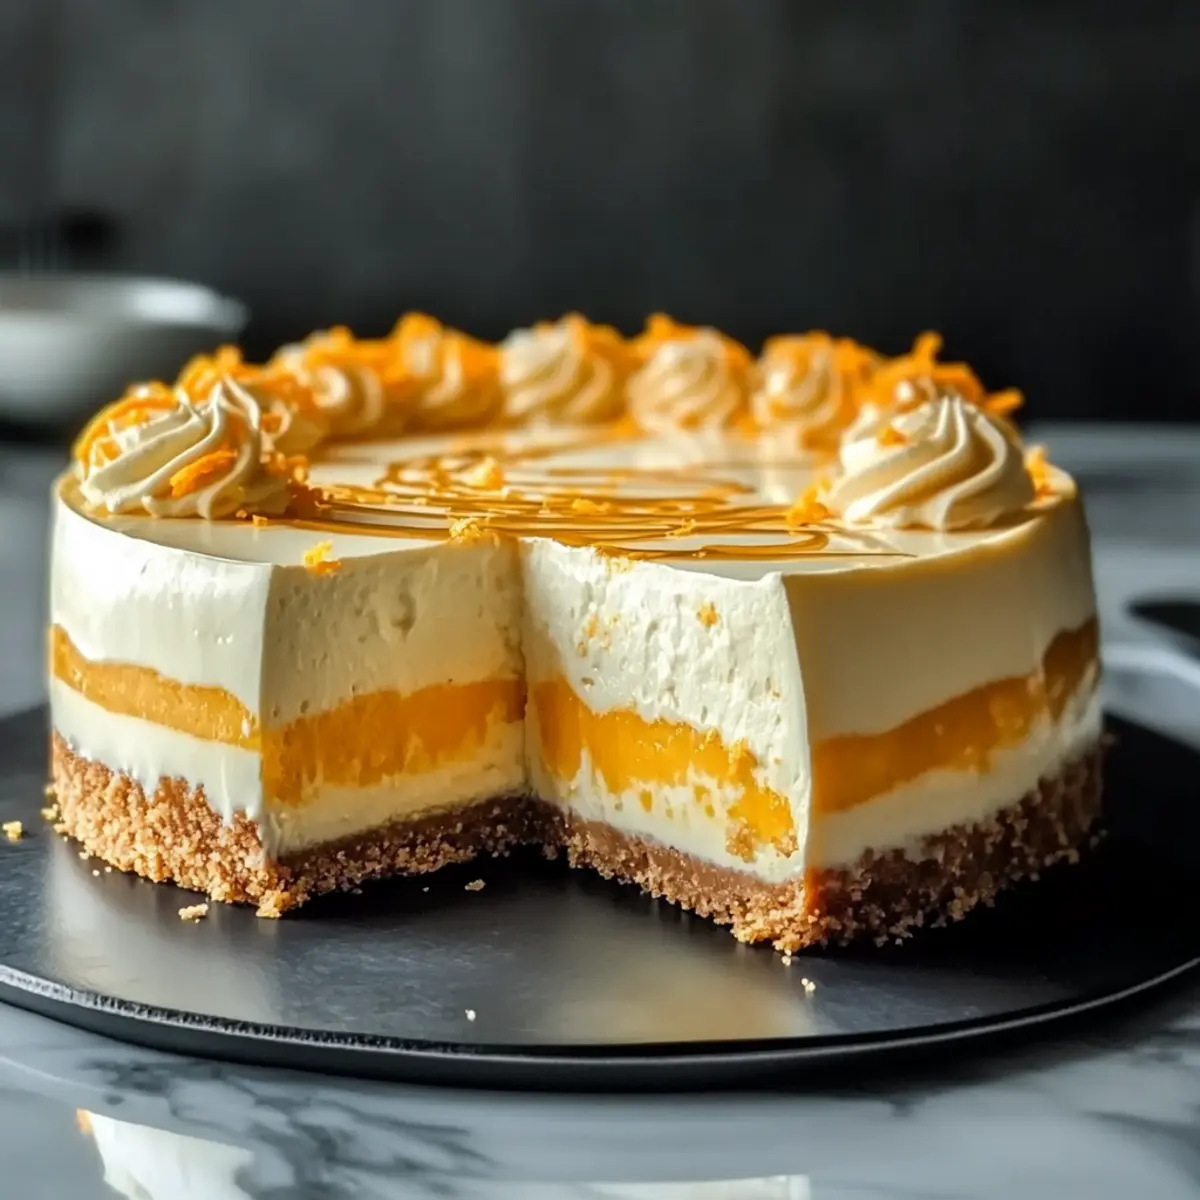
As I stepped into my kitchen on a hot summer afternoon, the thought of baking felt like a distant dream—I craved something cool and refreshing instead. Enter this No-Bake Creamsicle Cheesecake, a delightful twist on the classic summer treat that marries creamy vanilla with sunny orange zest. This recipe is not just quick and easy to whip up; it’s the perfect crowd-pleaser for any gathering, providing the right balance of sweet and citrusy bliss without the need for an oven. With its melt-in-your-mouth texture and charming appearance, it’s a dessert that’s bound to impress, leaving you free to enjoy the sunshine. Who else is ready to indulge in a slice of summer joy?
Why is this cheesecake a must-try?
Effortless Preparation: This No-Bake Creamsicle Cheesecake is as simple as it gets—nothing more complicated than mixing and chilling required!
Bright, Citrusy Goodness: Infused with fresh orange zest and juice, each bite delivers a refreshing kick that embodies summer.
Perfect for Gatherings: Ideal for any occasion, this cheesecake will wow your friends and family without keeping you in the kitchen for hours.
Versatile Joy: Not only can you switch up the flavors by incorporating toasted coconut or spices, but it also pairs beautifully with your favorite beverages.
Chill and Enjoy: With no baking time, this delightful dessert allows you to relax and enjoy the sunshine while it sets in the fridge.
If you’re looking for more refreshing treats, be sure to check out our delicious Blueberry Lemon Cheesecake or tantalizing Christmas Cheesecake Cranberry.
No-Bake Creamsicle Cheesecake Ingredients
For the Crust
• Graham Cracker Crumbs – Adds structure and crunch to the crust. Substitution: Use crushed cookies or gluten-free crumbs for a different base.
• Melted Butter – Binds the crust ingredients together and adds richness. Substitution: Coconut oil for a dairy-free version.
• Sugar – Sweetens the crust. Substitution: Brown sugar for a deeper flavor.
For the Filling
• Full-Fat Cream Cheese – Provides the creamy texture of the cheesecake. Substitution: Low-fat cream cheese for a lighter option; adjust whipped topping as necessary.
• Powdered Sugar – Adds sweetness and helps achieve a smooth filling. No direct substitution, but granulated sugar may be used in a pinch.
• Fresh Orange Zest – Infuses a bright, citrusy flavor. Tip: Use a microplane for the freshest zest.
• Fresh Lemon Juice – Balances sweetness and enhances the flavor. Substitution: Bottled lemon juice, although fresh is preferred.
• Vanilla Extract – Adds a warm, aromatic flavor to the filling. No major substitutions; vanilla essence could be used in smaller quantities.
• Whipped Topping – Lightens the filling and adds airiness. Substitution: Coconut whipped cream for a dairy-free alternative.
• Fresh Orange Juice – Contributes to the orange flavor and adds moisture. No direct substitution; freshly squeezed is best for flavor.
Now that we’ve gathered our ingredients, let the magic of summer begin with this delightful No-Bake Creamsicle Cheesecake!
Step‑by‑Step Instructions for No-Bake Creamsicle Cheesecake
Step 1: Prepare the Crust
In a mixing bowl, combine graham cracker crumbs, melted butter, and sugar until evenly mixed. The mixture should resemble wet sand. Press this blend firmly into the base of a 9-inch springform pan, ensuring it’s compact and even, which will create a sturdy foundation for your No-Bake Creamsicle Cheesecake.
Step 2: Make the Filling
In a large bowl, beat the softened cream cheese with powdered sugar using an electric mixer on medium speed until the mixture is smooth and creamy, about 2-3 minutes. Add in the fresh orange zest, lemon juice, fresh orange juice, and vanilla extract, mixing until all ingredients are well combined and the filling is rich with citrusy flavor.
Step 3: Incorporate Whipped Topping
Gently fold in the whipped topping using a spatula to maintain its light and airy texture. This step is crucial for achieving the cloud-like creaminess expected from your No-Bake Creamsicle Cheesecake. Mix until just combined, ensuring no lumps remain while keeping the mixture fluffy.
Step 4: Assemble the Cheesecake
Carefully spread the filling over the prepared crust in the springform pan, using a spatula to smooth the top evenly. Make sure the filling reaches the edges to create a clean, aesthetic finish. This layer of bright, creamy goodness captures the essence of the creamsicle flavors.
Step 5: Chill
Cover the cheesecake with plastic wrap and refrigerate for at least 4 hours, or until it is set and firm to the touch. The chilling process is essential to allow the flavors to meld together and for your No-Bake Creamsicle Cheesecake to achieve the perfect sliceable consistency.
Step 6: Serve
Once chilled and set, carefully remove the sides of the springform pan. Before slicing, garnish the top with extra orange zest or thin slices of fresh orange for a vibrant touch. Serve slices chilled and enjoy this refreshing summer delight with friends and family!
Expert Tips for No-Bake Creamsicle Cheesecake
Room Temperature Cheesecake: Ensure your cream cheese is at room temperature to achieve a silky-smooth texture in your No-Bake Creamsicle Cheesecake.
Gentle Folding: When incorporating whipped topping, gently fold to maintain the airiness. Over-mixing can make the filling dense.
Firm Crust: Press the crust mixture firmly into the pan to prevent it from crumbling. Adjust the melted butter if the crumbs feel too dry.
Chill Time: Allow at least 4 hours of chilling time to fully set the cheesecake. This is crucial for clean slices!
Garnish for Appeal: For a pop of color and added flavor, garnish with fresh orange zest or slices just before serving.
No-Bake Creamsicle Cheesecake Variations
Feel free to brighten up your no-bake cheesecake experience with these delightful twists and substitutions that enhance flavor and cater to your preferences.
-
Tropical Twist: Add toasted coconut to the crust for an exotic crunch. This little addition brings a taste of the tropics to your summer dessert.
-
Spiced Delight: Incorporate a pinch of cinnamon or nutmeg into the filling for a warm, fragrant undertone. A hint of spice can elevate the zesty notes beautifully.
-
Dairy-Free Version: Substitute full-fat cream cheese with a dairy-free cream cheese alternative and use coconut whipped cream. It’s an easy way to enjoy this creamy delight without dairy!
-
Fruit Fusion: Top with fresh berries or sliced peaches for added sweetness and color. This delightful addition not only looks beautiful but also brings a refreshing flavor contrast.
-
Chocolate Drizzle: Drizzle melted dark or white chocolate over the cheesecake before serving. This will add an indulgent sweetness that pairs beautifully with the citrus flavors.
-
Citrus Medley: Mix in lemon or lime zest along with the orange for an extra layer of refreshing citrus flavor. This variation brightens the cheesecake and enhances its summer vibe.
-
Flavored Whipped Topping: Use flavored whipped toppings, like lemon or mango, to switch up the profile and make each bite a little different. This twist would bring a tangy surprise to your creamy base.
If you’re seeking inspiration beyond the creamsicle flavors, don’t forget to check out our delightful Strawberry Cheesecake Protein for a healthier take or consider the tartness of our Christmas Cheesecake Cranberry for a very festive touch. Enjoy getting creative in the kitchen!
What to Serve with No-Bake Creamsicle Cheesecake
Enjoy the perfect summer feast by pairing delicious treats that enhance the refreshing flavors of this delightful cheesecake.
-
Creamy Mashed Potatoes: The smooth, buttery potatoes create a comforting contrast, adding an unexpected richness to your meal.
-
Crispy Garden Salad: Light and refreshing, a salad with mixed greens and citrus dressing brightens up the palate between bites of dessert.
-
Toasted Almond Biscotti: This crunchy treat provides a satisfying texture and nutty flavor that complements the creamy cheesecake wonderfully.
-
Sparkling Lemonade: Pair this cheesecake with a fizzy, citrusy drink to enhance the vibrant orange notes in your dessert while keeping things cool.
-
Fresh Fruit Salad: Combine seasonal fruits like berries and melons for a light, sweet contrast that balances the cheesecake’s richness beautifully.
-
Chocolate-Covered Strawberries: The luscious chocolate pairs excellently with the creamy cheesecake, adding a luscious touch to your summer spread.
-
Ice Cream Floats: Opt for a refreshing float with lemon-lime soda and a scoop of vanilla ice cream for a delightful bubbly treat alongside your dessert.
Elevate your summertime meals with these comforting and flavorful pairings that celebrate the essence of summer.
Make Ahead Options
These No-Bake Creamsicle Cheesecakes are perfect for meal prep enthusiasts looking to save time during busy weeks! You can prepare the crust by mixing the graham cracker crumbs, melted butter, and sugar up to 24 hours in advance; simply store it in the refrigerator in an airtight container to maintain its crunch. The filling can also be made ahead, combining the cream cheese, powdered sugar, orange zest, lemon juice, orange juice, and vanilla, and stored in the fridge for up to 3 days. When you’re ready to serve, gently fold in the whipped topping, spread the filling over the crust, and chill for at least 4 hours until set. This way, you can enjoy a delicious dessert with minimal last-minute effort!
Storage Tips for No-Bake Creamsicle Cheesecake
Fridge: Store leftovers in an airtight container in the refrigerator for up to 3 days for the best flavor and texture.
Freezer: If you need to keep it longer, wrap individual slices tightly in plastic wrap and then aluminum foil. It can last in the freezer for up to 1 month.
Thawing: To enjoy frozen slices, transfer them to the fridge and let them thaw overnight. Re-garnish with fresh orange zest before serving for a vibrant touch.
Make Ahead: This no-bake creamsicle cheesecake can be prepared up to 24 hours in advance, making it a perfect option for stress-free entertaining.
No-Bake Creamsicle Cheesecake Recipe FAQs
What ingredients should I look for when buying oranges?
Absolutely! When selecting oranges for this No-Bake Creamsicle Cheesecake, look for firm, heavy oranges with a vibrant color and smooth skin, avoiding any that have dark spots or feel soft. A fresh, juicy orange will yield the best flavor for your cheesecake.
How should I store leftovers of the cheesecake?
You can store leftover No-Bake Creamsicle Cheesecake in an airtight container in the refrigerator for up to 3 days. Make sure it’s well-covered to maintain its creamy texture and fresh flavor. If needed, label the container with the date for easy tracking!
Can I freeze the cheesecake, and how do I do it?
Very! You can absolutely freeze your No-Bake Creamsicle Cheesecake. Start by wrapping individual slices tightly in plastic wrap, ensuring no air is trapped inside, and then place them in a freezer-safe bag or container. It can be kept frozen for up to 3 months. When you’re ready to enjoy, simply transfer a slice to the refrigerator and let it thaw overnight.
What can I do if my cream cheese mixture is lumpy?
If you find that your mixture is lumpy, it may be that the cream cheese wasn’t softened enough. Make sure to let it sit at room temperature for at least 30 minutes before mixing, and use a hand mixer to blend it until it’s smooth. If you have lumps, try giving it an extra minute of mixing but be careful not to over-mix, as this could affect the fluffiness of your No-Bake Creamsicle Cheesecake.
Is this cheesecake suitable for people with dietary restrictions?
The good news is that this No-Bake Creamsicle Cheesecake can be made suitable for various dietary preferences. For a gluten-free option, substitute the graham cracker crumbs with gluten-free cookies. If you’re looking for a dairy-free version, use coconut whipped cream instead of the whipped topping and replace cream cheese with a vegan alternative. Always double-check ingredient labels for potential allergens!
No-Bake Creamsicle Cheesecake
Ingredients
Equipment
Method
- In a mixing bowl, combine graham cracker crumbs, melted butter, and sugar until evenly mixed. Press the blend into the base of a 9-inch springform pan.
- In a large bowl, beat the softened cream cheese with powdered sugar until smooth. Add in orange zest, lemon juice, orange juice, and vanilla extract, mixing until well combined.
- Gently fold in the whipped topping using a spatula until just combined.
- Spread the filling over the prepared crust, ensuring an even top.
- Cover with plastic wrap and refrigerate for at least 4 hours, or until set.
- Remove the springform pan and garnish with orange zest or slices before serving.
Leave a Reply