
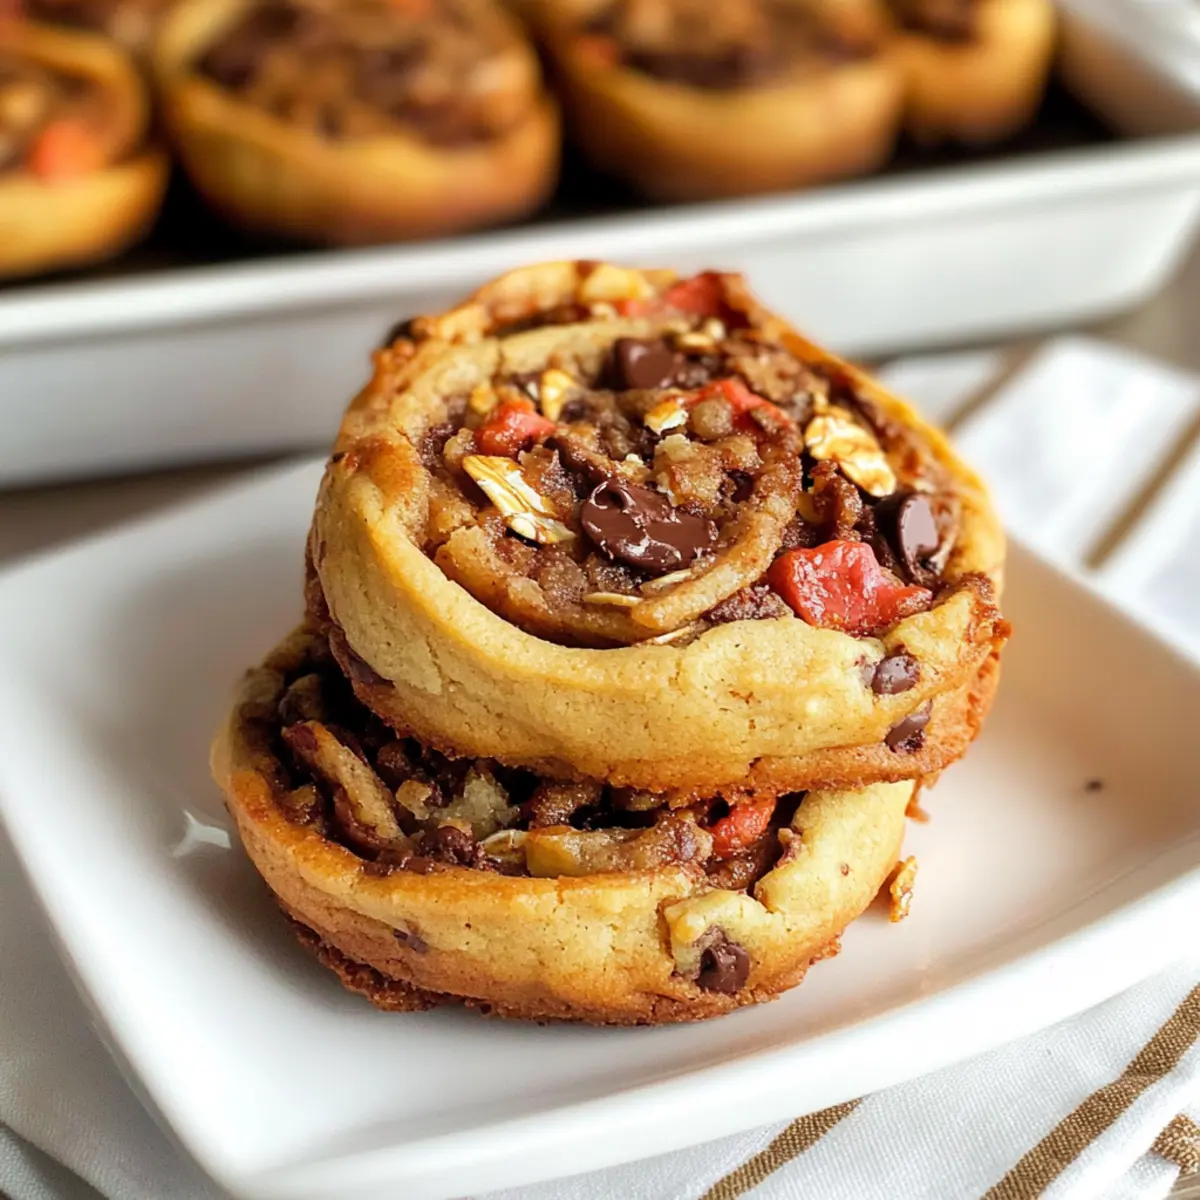
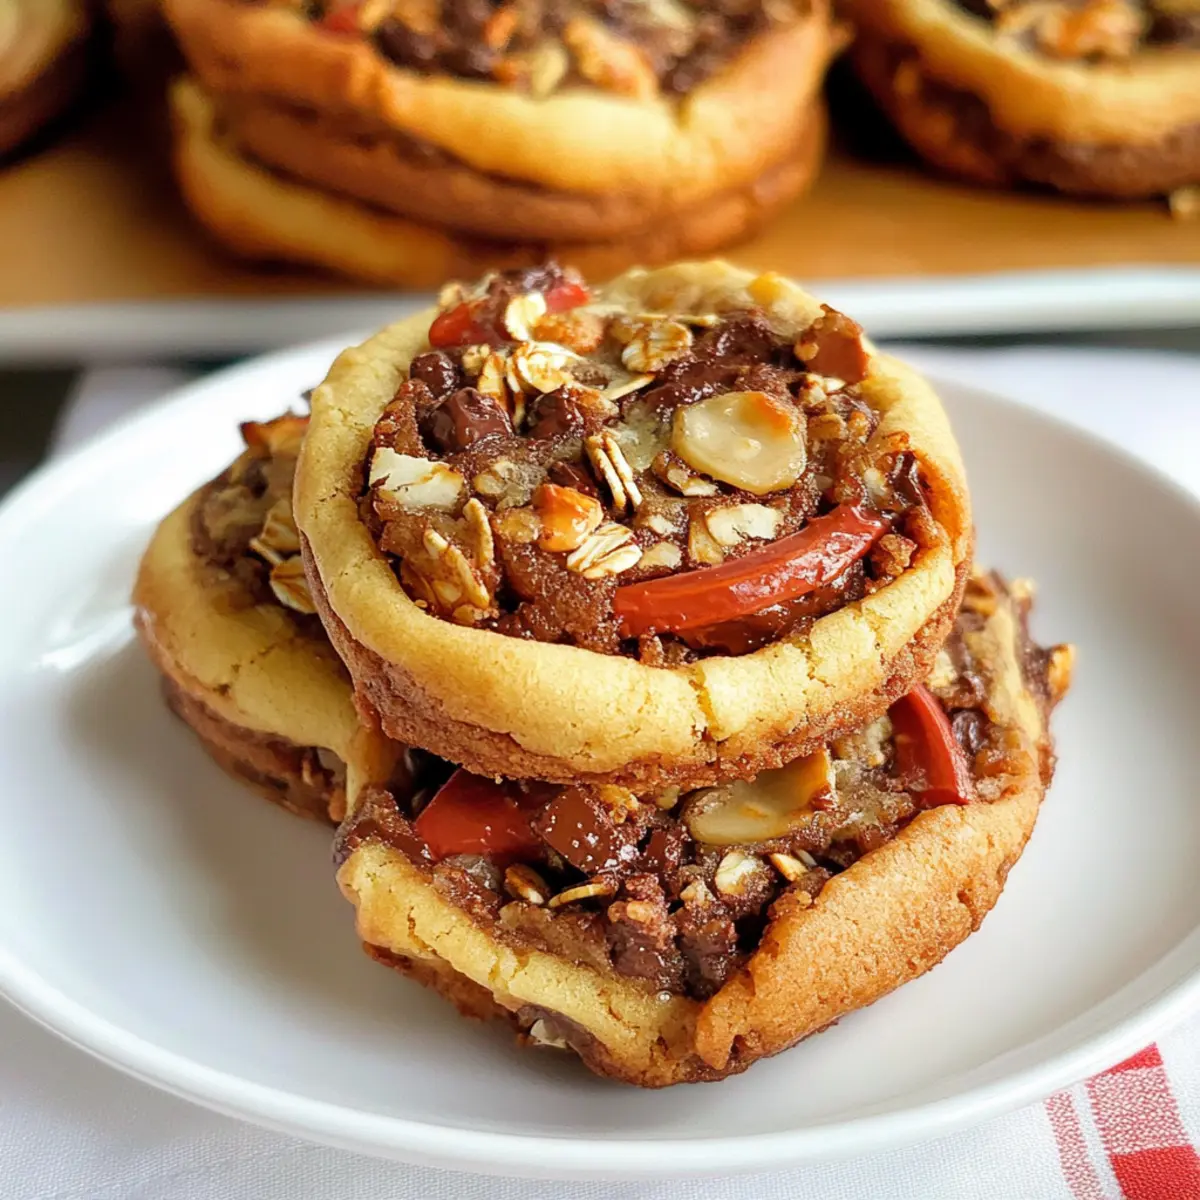
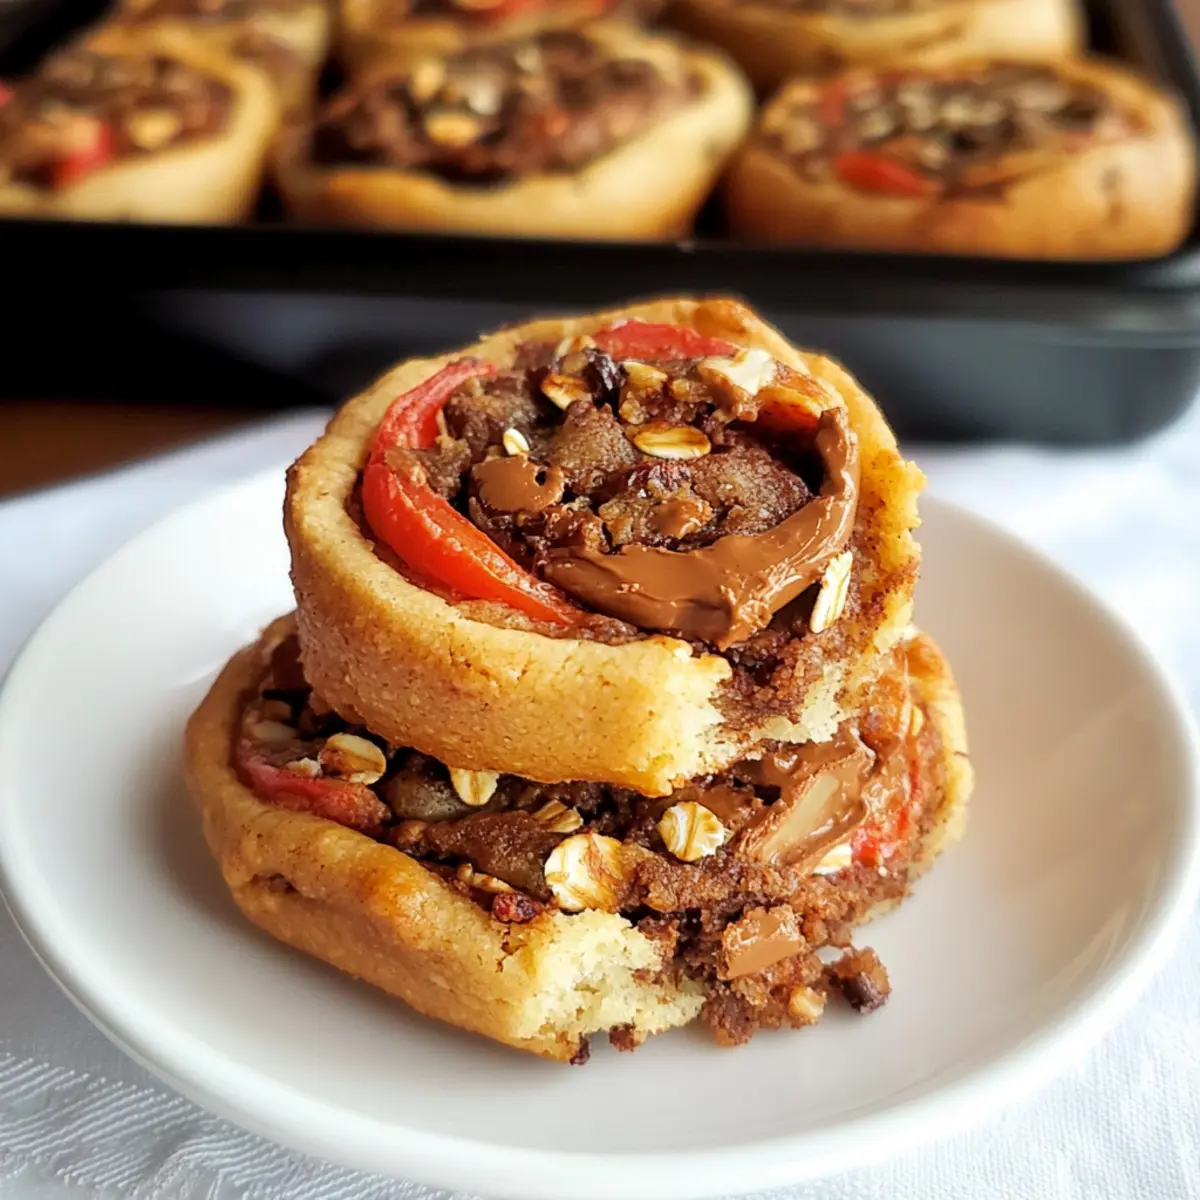
As I rolled out the dough, the comforting scent of chocolate filled my kitchen—an aromatic promise of deliciousness to come. These Gluten-Free Chocolate Oat Cookies have become my go-to recipe for satisfying that sweet tooth without the guilt. Perfect for those rushed afternoons or quiet evenings, they strike the delightful balance between indulgence and healthiness. With a chewy texture and a subtle crunch, they are not just easy to whip up but also adaptable to various diets, thanks to their gluten-free option. Plus, who doesn’t love a treat that can double as a quick snack or a delightful dessert? So, what are your favorite mix-ins? Let’s dive into this cookie adventure together!
Why Are These Cookies So Irresistible?
Simplicity: You only need a handful of ingredients to whip these up, making them an ideal choice for beginner bakers and busy cooks alike.
Versatile: With options for both traditional and gluten-free versions, everyone can indulge! Feel free to toss in your favorite nuts or dried fruits for personalized variations.
Healthy Indulgence: Packed with oats and antioxidants from cocoa, these cookies offer a guilt-free treat without sacrificing flavor.
Quick to Make: In just about 20 minutes, you can transform your kitchen into a cookie paradise—perfect for those last-minute cravings.
Crowd Pleaser: Whether for kids or adults, these cookies will disappear quickly at any gathering, pairing perfectly with a warm cup of milk! Enjoy them alongside other favorites like Beer Brat Pizza for a delightful snack spread.
Chocolate Oat Cookie Ingredients
For the Cookie Base
• Rolled Oats – Essential for the chewy texture; choose rolled oats for that perfect balance.
• Cocoa Powder – Provides rich chocolate flavor; opt for unsweetened for an intense taste.
• Brown Sugar – Adds sweetness and moisture; you can use coconut sugar for a healthier swap.
• Egg – Binds the ingredients together; substitute with a flaxseed meal for a vegan version.
• Butter or Coconut Oil – Adds richness and aids spread; dairy-free alternatives work just as well.
• Chocolate Chips – Enhance the chocolate experience; dark chocolate chips are a delicious choice.
• Salt – Balances the sweetness; adjust to your liking for a perfect flavor boost.
For Special Variations
• Nuts (e.g., walnuts, pecans) – Add for a delightful crunch; they also boost nutrition.
• Dried Fruits (e.g., raisins, cranberries) – Sweetens each bite with added flavor; experiment based on preference.
These delightful chocolate oat cookies are sure to impress everyone, so gather your ingredients and get ready for a tasty treat!
Step‑by‑Step Instructions for Gluten-Free Chocolate Oat Cookies
Step 1: Preheat the Oven
Begin by preheating your oven to 350°F (175°C). While it’s heating, line a baking sheet with parchment paper to prevent sticking and ensure easy cleanup later. This setup allows for a seamless baking experience, keeping your focus on creating those delicious gluten-free chocolate oat cookies.
Step 2: Mix the Dry Ingredients
In a large mixing bowl, combine rolled oats, cocoa powder, brown sugar, and a pinch of salt. Stir these dry ingredients together until they are thoroughly mixed; the rich brown color of cocoa will blend beautifully with the oats. This foundation will create the chewy texture we love in chocolate oat cookies.
Step 3: Prepare the Wet Ingredients
In a small saucepan, melt butter or coconut oil over low heat. Once melted, let it cool slightly before whisking in the egg or your chosen egg substitute. This process introduces extra moisture and richness that will bind the cookie dough together, so be sure to incorporate it well with the melted fat.
Step 4: Combine Wet and Dry Ingredients
Pour the wet mixture into the bowl of dry ingredients. Stir together gently until just combined; be cautious not to overmix, as this can make the cookies tough. The dough should appear slightly sticky yet hold together well, ready to embrace the chocolate chips that will elevate these gluten-free chocolate oat cookies.
Step 5: Fold in Chocolate Chips
Add your chocolate chips to the mixture and fold them in evenly, ensuring they are distributed throughout the dough. This step enhances the chocolate flavor in every bite, creating sweet, melty pockets when baked. The delightful aroma of chocolate will start to fill your kitchen, enticing everyone nearby.
Step 6: Scoop the Cookie Dough
Using a tablespoon, scoop out portions of the dough and place them on the prepared baking sheet, spacing each one about 2 inches apart. This spacing allows room for spreading while baking. As you arrange the dollops of dough, take a moment to admire the chocolate and oatmeal beauty forming on your baking sheet.
Step 7: Bake the Cookies
Place the baking sheet in your preheated oven and bake for 10-12 minutes. Keep an eye on them; the edges should appear set and slightly firm, while the centers will look soft. This contrast ensures that your gluten-free chocolate oat cookies will come out chewy yet satisfyingly baked.
Step 8: Cool Before Serving
Once baked, remove the cookies from the oven and let them cool on the baking sheet for a few minutes. This step is crucial for allowing the cookies to firm up as they cool. After a brief rest, transfer them gently to a wire rack to cool completely. Enjoy the anticipation of sharing these delightful treats!
Expert Tips for Gluten-Free Chocolate Oat Cookies
• Room Temperature Ingredients: Ensure all ingredients are at room temperature. This helps achieve better mixing and a smoother dough for your gluten-free chocolate oat cookies.
• Don’t Overmix: Be careful not to overmix your dough. Overmixing can lead to tough cookies, so mix until just combined for the best texture.
• Cool on Baking Sheet: Allow cookies to cool on the baking sheet for a few minutes before transferring them to a wire rack. This resting time keeps them soft and chewy.
• Watch Baking Time: Keep an eye on your cookies as they bake. If you prefer a crunchier texture, bake a couple of minutes longer, but avoid burning!
• Experiment with Mix-Ins: Fancy a twist? Feel free to add nuts or dried fruits to enhance flavor and texture in your gluten-free chocolate oat cookies.
Variations & Substitutions for Chocolate Oat Cookies
Feel free to put your own spin on these delightful cookies, creating a custom treat that you and your loved ones will adore.
-
Gluten-Free: Use certified gluten-free oats to keep this recipe safe for anyone avoiding gluten. Simple and satisfying, they’re perfect for all occasions.
-
Vegan: Swap the egg for a flaxseed meal or a chia egg. This option maintains moisture and binding, ensuring everyone enjoys the delightful chewy texture.
-
Nutty Delight: Add chopped nuts like walnuts or pecans to enhance both the flavor and crunch of your cookies. They add a new dimension, making each bite even more delightful!
-
Fruit Fusion: Stir in dried fruits such as raisins or cranberries for a fruity twist that complements the chocolate. The extra sweetness with chewy textures can elevate these treats beautifully.
-
Peanut Butter Bliss: For a richer flavor, incorporate peanut butter into the dough. It adds an irresistible creaminess, perfect for those who love a nutty kick in their cookies.
-
Spice It Up: Add a pinch of cinnamon or a dash of vanilla extract to the mixture for a warm, inviting aroma. Each cookie gets a hint of spice that adds to its charm.
-
Extra Chocolatey: Use dark chocolate chips or chunks—try flavored varieties like mint or sea salt for a deliciously unique twist. The rich cocoa flavor deepens, making them even more of a chocolate lover’s dream.
-
Chunky Chocolate: Try incorporating chocolate chunks instead of chips for a more decadent, melty experience. Each bite will be a delightful surprise!
Take the opportunity to experiment with these variations in your next baking session. You could even pair these cookies with a warm slice of Roasted Garlic Pizza for a fun snack spread—say goodbye to bland fast food, and bring delicious home-cooked joy into your kitchen!
What to Serve with Gluten-Free Chocolate Oat Cookies
As you savor the delights of these chewy treats, consider pairing them with something that enhances their rich chocolatey flavor.
-
Creamy Vanilla Ice Cream: The cool, sweet creaminess contrasts beautifully with the warm, chewy cookies, turning each bite into a dessert dream.
-
Fresh Berries: Juicy strawberries or tart raspberries add a refreshing burst of flavor, balancing the sweetness of the cookies and providing a lovely color contrast.
-
Nutty Hot Chocolate: Serve with a cup of hot chocolate infused with hazelnut for a cozy drink that mirrors the comforting chocolate in the cookies. Sipping this while enjoying the cookies is a heartwarming experience.
-
Roasted Almonds: These crunchy bites offer a delightful nutty crunch that complements the soft chewiness of the cookies, adding a satisfying texture.
-
Dairy-Free Milk: Almond or oat milk will enhance the cookies’ flavors without overpowering them, making it an ideal dipping companion.
-
Caramel Sauce: Drizzle warm caramel over the cookies for a decadent twist that adds rich sweetness and gooey texture, perfect for indulgence.
-
Coconut Yogurt: Add a dollop of creamy coconut yogurt to complement the chocolate and oats. Its tanginess balances the sweetness while adding a luscious texture.
Each pairing elevates your cookie experience, bringing out the joy in every bite!
Make Ahead Options
These Gluten-Free Chocolate Oat Cookies are perfect for meal prep enthusiasts! You can mix the dry ingredients (oats, cocoa powder, brown sugar, and salt) up to 3 days in advance and store them in an airtight container to maintain freshness. Additionally, you can prepare the wet ingredients and refrigerate them for up to 24 hours; this helps ensure the cookies bake evenly. When you’re ready to enjoy, simply combine the mixtures, fold in the chocolate chips, scoop onto the baking sheet, and bake as directed. This way, you have delicious, fresh cookies with minimal effort on those busy days!
How to Store and Freeze Chocolate Oat Cookies
Room Temperature: Store the cookies in an airtight container at room temperature for up to 5 days to maintain their chewy texture and flavor.
Fridge: If you’d like them to last a little longer, refrigerate them in an airtight container for up to 1 week. Just warm them slightly before serving for that fresh-baked feel.
Freezer: For longer storage, freeze chocolate oat cookies in a single layer, then transfer to a zip-top bag, sealing tightly. They can be stored for up to 3 months.
Reheating: To enjoy a warm treat, microwave frozen cookies for 10-15 seconds or let them thaw at room temperature before gently warming them.
Chocolate Oat Cookies Recipe FAQs
What type of oats should I use for gluten-free chocolate oat cookies?
I recommend using rolled oats as they provide the perfect chewy texture for these cookies. Quick oats can be substituted if you prefer a softer cookie, but rolled oats are best for that classic texture we’ve come to love.
How should I store chocolate oat cookies?
Store your cookies in an airtight container at room temperature for up to 5 days to keep them wonderfully chewy. If you want to prolong their freshness, refrigerate them for about a week. Just remember to warm them up a little before enjoying for that just-baked goodness!
Can I freeze chocolate oat cookies?
Absolutely! For freezing, start by placing the cookies in a single layer on a baking sheet and freeze them until solid. Once frozen, transfer them to a zip-top bag, remove excess air, and seal tightly. They can last for up to 3 months in the freezer. When you’re ready to enjoy, microwave them for 10-15 seconds or allow them to thaw at room temperature.
What should I do if my cookie dough is too dry?
If your dough feels too dry, don’t fret! You can add a tablespoon of melted butter or coconut oil to the mixture to help moisten it up. If you need it to be even softer, a little splash of milk or a sprinkle of water can make a big difference. Just mix it in gradually until you achieve the desired consistency.
Are there any dietary considerations for these cookies?
Certainly! These chocolate oat cookies can easily cater to various dietary needs. For a gluten-free option, be sure to use certified gluten-free oats and dairy-free butter alternatives. You can also make them vegan by substituting the egg with a flaxseed meal or chia egg (mix 1 tablespoon of flaxseed meal or chia seeds with 2.5 tablespoons of water, let it sit until thickened).

Muffuletta Pizza Rolls: A Tasty Twist on a Classic Favorite
Ingredients
Equipment
Method
- Preheat the oven to 350°F (175°C) and line a baking sheet with parchment paper.
- In a large bowl, mix rolled oats, cocoa powder, brown sugar, and salt.
- Melt butter or coconut oil in a saucepan, then whisk in the egg or substitute after cooling.
- Combine wet and dry ingredients gently until just mixed.
- Fold in the chocolate chips evenly.
- Scoop out tablespoon portions onto the baking sheet, spacing them 2 inches apart.
- Bake for 10-12 minutes until edges are set but centers are soft.
- Cool on the baking sheet for a few minutes before transferring to a wire rack.
Leave a Reply