
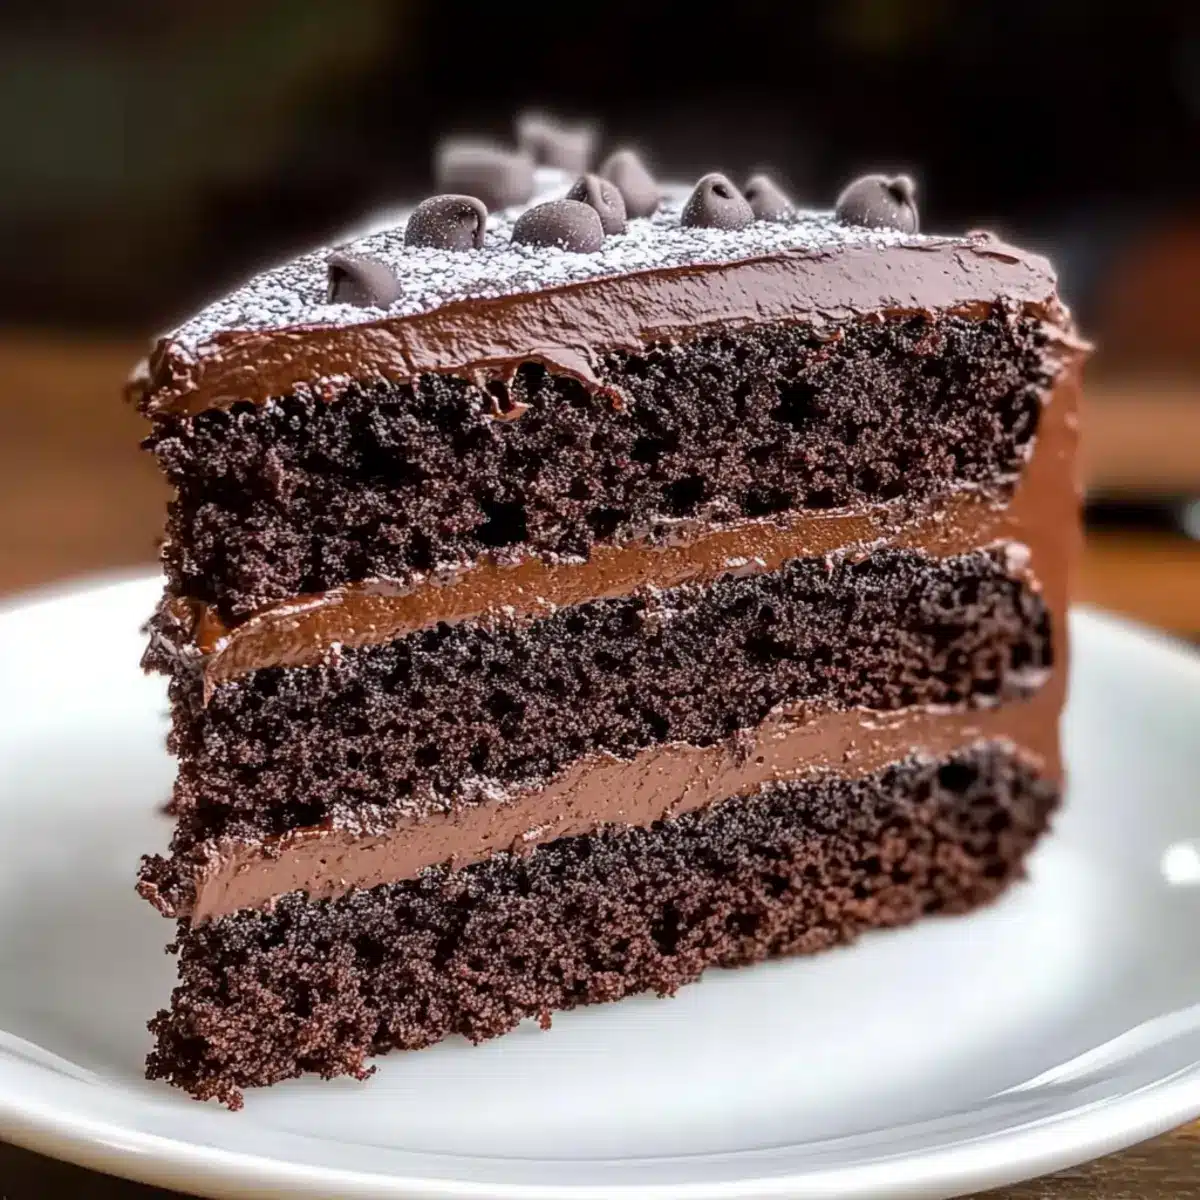
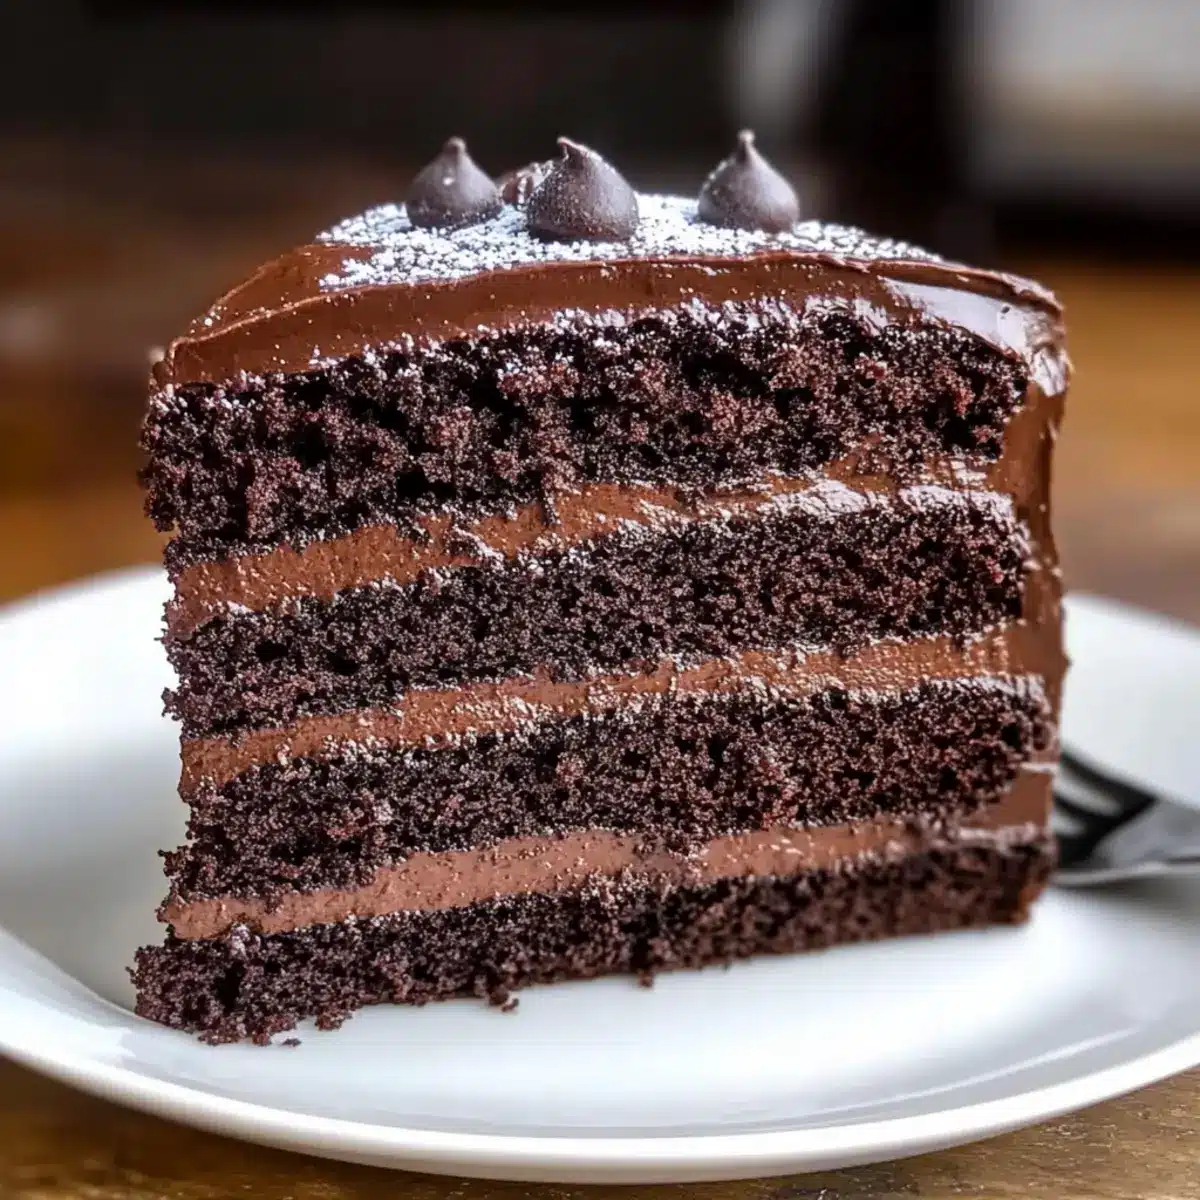
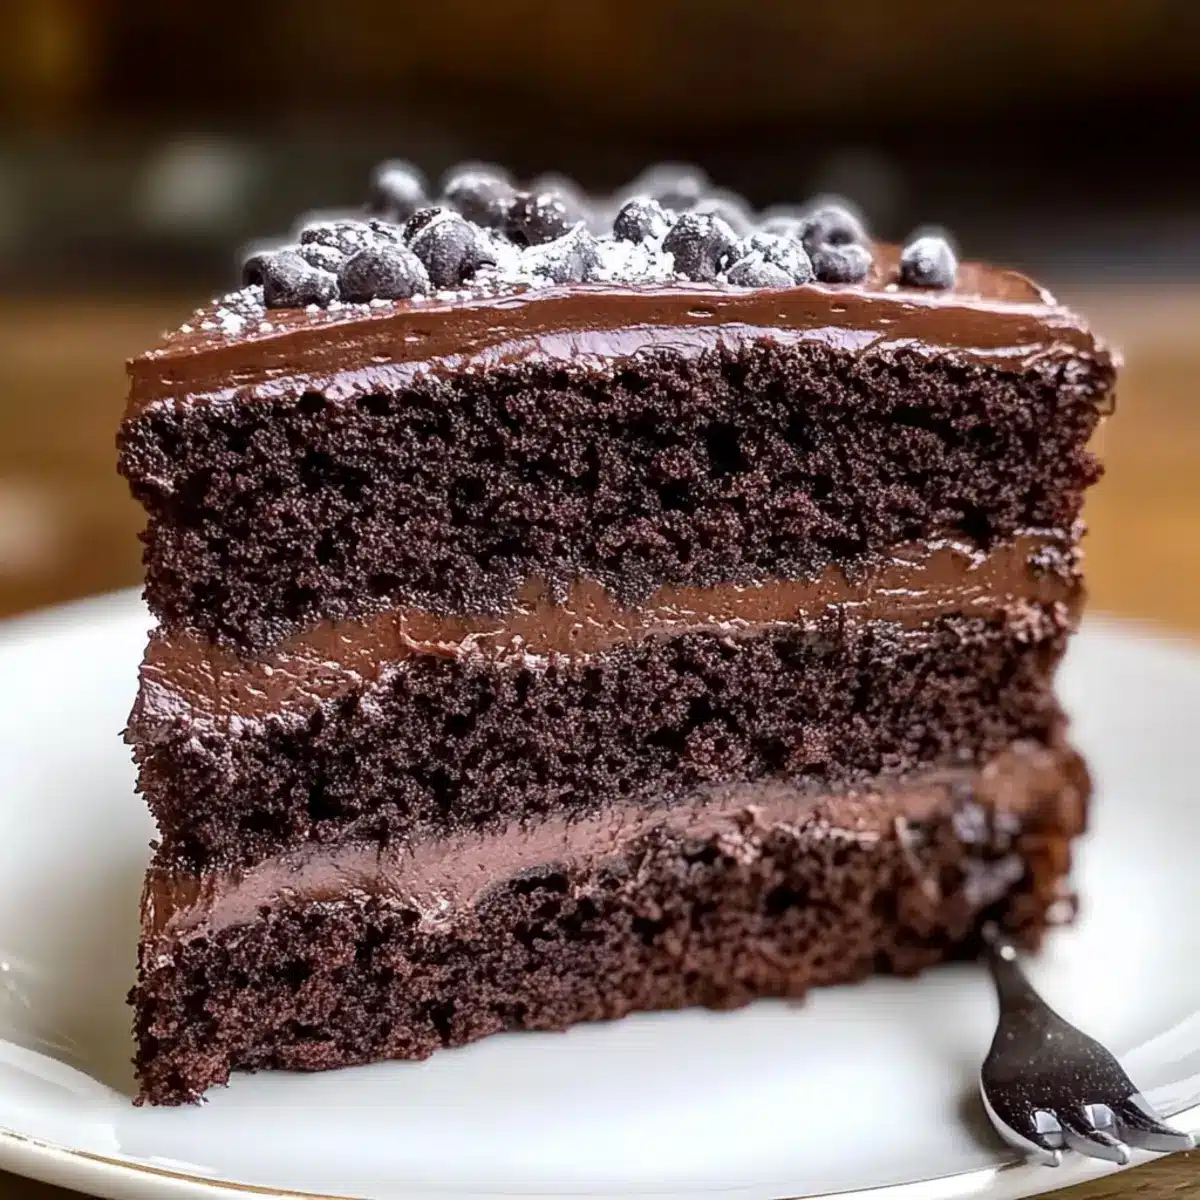
The scent of rich chocolate fills the air as I prepare to bake my Moist and Decadent Chocolate Layer Cake, a delightful centerpiece perfect for any occasion. This cake is not just a dessert; it’s an experience that combines simplicity with a touch of elegance, ensuring you can impress both friends and family with minimal effort. With its gluten-free and dairy-free adaptations, everyone can indulge in this melt-in-your-mouth chocolate delight. Whether you’re celebrating a special moment or simply need a sweet escape from the daily grind, this layer cake brings comfort and joy to your table. Curious how to create this masterpiece that’s perfect for make-ahead prep? Let’s dive into the steps that will have you savoring each heavenly bite!

Why is This Chocolate Layer Cake Amazing?
Simplicity in Preparation: Easy-to-follow steps ensure that even novice bakers can create a stunning cake.
Indulgent Flavor: The combination of rich cocoa and brewed coffee enhances the chocolate richness, making every bite irresistible.
Versatile Options: Gluten-free and dairy-free variations mean everyone can join in on the deliciousness, from your vegan friends to gluten-sensitive family members.
Make-Ahead Marvel: This cake can be prepared a day in advance, allowing the flavors to develop beautifully—perfect for stress-free entertaining!
Crowd-Pleasing Delight: Whether it’s for a birthday, anniversary, or a casual gathering, this cake will impress your guests and leave them coming back for more.
For more delightful baking recipes, check out our Chocolate Custard Cake and Butterbeer Cream Cake for more sweet inspiration!
Chocolate Layer Cake Ingredients
For the Cake
• All-Purpose Flour – Provides structure; can be replaced with a gluten-free flour blend for a gluten-free option.
• Granulated Sugar – Adds sweetness and texture; brown sugar can create a deeper flavor.
• Unsweetened Cocoa Powder – Delivers rich chocolate flavor; avoid Dutch-processed for the best results.
• Baking Soda – Helps the cake rise beautifully.
• Baking Powder – Works alongside baking soda to ensure perfect lift.
• Buttermilk – Contributes moisture and richness; substitute with a milk and vinegar combo if needed.
• Vegetable Oil – Maintains moisture; melted butter can be an alternative.
• Eggs – Provides structure and richness; can be swapped with flax eggs or applesauce for a vegan version.
• Vanilla Extract – Enhances flavor; always opt for pure extract for the best taste.
• Brewed Coffee – Intensifies the chocolate flavor without adding a coffee taste; hot water is a fine substitute.
For the Frosting
• Chocolate Frosting – Made from cocoa powder, powdered sugar, butter, heavy cream, and vanilla for a creamy finish.
Step‑by‑Step Instructions for Moist and Decadent Chocolate Layer Cake
Step 1: Preheat and Prepare
Start by preheating your oven to 350°F (175°C). While the oven heats, grease and flour two 9-inch round cake pans, ensuring even coverage to prevent sticking. A light dusting of flour will create a perfectly baked chocolate layer cake, making it easier to remove after baking.
Step 2: Mix Dry Ingredients
In a large mixing bowl, whisk together 2 cups of all-purpose flour, 2 cups of granulated sugar, 3/4 cup of unsweetened cocoa powder, 1 1/2 teaspoons of baking soda, and 1 1/2 teaspoons of baking powder. Mix until no lumps remain, ensuring the dry ingredients are well combined for a smooth, rich chocolate layer cake.
Step 3: Combine Wet Ingredients
In a separate bowl, pour in 1 cup of buttermilk, 1/2 cup of vegetable oil, 2 large eggs, and 2 teaspoons of vanilla extract. Whisk until the mixture is smooth and thoroughly combined. This rich wet mixture will add moisture and flavor to your chocolate layer cake batter, transforming it into a decadent delight.
Step 4: Blend Wet and Dry
Carefully pour the wet mixture into the dry ingredients, stirring gently until just combined. Avoid overmixing; a few lumps are perfectly fine. This step is crucial to ensure your chocolate layer cake remains moist and light, so embrace a gentle hand here!
Step 5: Add Brewed Coffee
Once blended, gradually incorporate 1 cup of hot brewed coffee into the batter, mixing at low speed. The batter will be thin, but this is exactly what you want! The hot coffee deepens the chocolate flavor without imparting any coffee notes, elevating your chocolate layer cake to heavenly levels.
Step 6: Bake the Cakes
Divide the thin batter evenly between the two prepared pans. Place them in the preheated oven and bake for 30-35 minutes, or until a toothpick inserted into the center comes out clean. You’ll know your chocolate layer cake is ready when it has risen beautifully and springs back when lightly touched.
Step 7: Cool the Cakes
Remove the cakes from the oven and let them cool in the pans for 15 minutes. Carefully transfer them to a wire rack using a spatula, allowing them to cool completely. This step is essential; frosting a warm cake can lead to a melty mess, so patience will reward you with a perfectly layered dessert.
Step 8: Frost and Assemble
Once your cakes are completely cool, it’s time to frost! Spread a generous layer of chocolate frosting between the two cake layers, and then cover the top and sides of the cake. Feel free to be as creative as you’d like with your frosting design for a stunning presentation of your moist and decadent chocolate layer cake.
Tips for the Best Chocolate Layer Cake
-
Room Temperature Ingredients: Ensure all ingredients are at room temperature for a smoother batter and better texture in your chocolate layer cake.
-
Don’t Overmix: Mix just until combined. Overmixing can lead to a denser cake rather than the light, moist cake you desire.
-
Complete Cooling: Allow your cakes to cool completely in their pans before frosting. This prevents melted frosting and helps maintain layers.
-
Coffee Magic: Incorporate brewed coffee to intensify the chocolate flavor. If you prefer not to use coffee, hot water can be a successful substitute.
-
Frosting Techniques: Use a spatula to create beautiful swirls or patterns in your frosting for a stunning presentation that will impress guests.
Chocolate Layer Cake Variations
Feel free to get creative and make this cake your own with these delightful variations!
-
Gluten-Free: Swap all-purpose flour with a gluten-free flour blend to create a cake everyone can enjoy. It retains moisture and richness!
-
Dairy-Free: Use almond milk mixed with a splash of vinegar instead of buttermilk for a dairy-free twist. Your cake will remain just as luscious and delicious!
-
Berry Bliss: Stir in a cup of fresh berries into the batter for a fruity delight. The burst of color and flavor brings a lovely surprise in every bite.
-
Spiced Up: Add a teaspoon of cayenne pepper or cinnamon for a hint of warmth and complexity. It’s an unexpected twist that pairs beautifully with chocolate!
-
Decadent Layers: To impress, consider creating a three-layer cake by baking an extra layer. Stack them high with frosting in between for an eye-catching presentation.
-
Frosting Flavors: Experiment with flavored frostings, such as cream cheese or a salted caramel frosting, for a new twist on the chocolate layering experience.
-
Nutty Addition: Fold in chopped nuts, like walnuts or hazelnuts, into the batter for added crunch and flavor. It makes every bite even more satisfying!
For more delightful cake inspirations, don’t forget to explore our irresistible Peanut Butter Chocolate and refreshing Pineapple Rum Cake. Happy baking!
How to Store and Freeze Chocolate Layer Cake
Room Temperature: Store your chocolate layer cake at room temperature for up to 3 days using a cake dome or wrapping in plastic wrap to keep it fresh.
Fridge: If you haven’t finished the cake within 3 days, refrigerate it for up to a week. Make sure it’s well wrapped to retain moisture.
Freezer: For long-term storage, freeze individual slices of the chocolate layer cake for up to 3 months. Use airtight containers or wrap slices in plastic wrap to prevent freezer burn.
Reheating: To enjoy frozen slices, thaw them in the refrigerator overnight, then bring to room temperature before serving for the best flavor and texture.
What to Serve with Indulgent Chocolate Layer Cake
Delight in pairing your sweet creation with tantalizing sides that enchant the senses.
-
Fresh Berries: The tartness of strawberries or raspberries balances the rich chocolate, offering a refreshing contrast. Pairing these with the cake enhances both flavor profiles, delighting each bite.
-
Vanilla Ice Cream: Creamy and smooth, it adds a delightful chill to the warm cake, making it an irresistible treat. The vanilla flavor complements the chocolate beautifully, promising to elevate your dessert experience.
-
Chocolate Ganache: A silky chocolate ganache poured over the cake enhances its indulgent nature, enveloping each slice in a luscious finish. This extra layer of chocolate intensifies the decadence and will leave your guests in bliss.
-
Caramel Sauce: Drizzling homemade or store-bought caramel adds a sweet complexity that beautifully contrasts with the cake’s rich chocolate flavor. It’s a perfect match for anyone who enjoys a little extra sweetness in their dessert.
-
Whipped Cream: Light and airy, whipped cream makes a perfect topping, balancing the dense chocolate layers with its fluffy texture. Consider adding a sprinkle of cocoa powder or a hint of vanilla for a delightful touch.
-
Coffee: A rich cup of coffee enhances the chocolate flavor, creating a delightful celebration of cocoa. This pairing can elevate your dessert experience, making it feel like a gourmet dining occasion.
Make Ahead Options
These Moist and Decadent Chocolate Layer Cakes are perfect for meal prep! You can bake the cakes up to 24 hours in advance; simply allow them to cool completely, then wrap each layer tightly in plastic wrap to maintain moisture. For even richer flavors, feel free to refrigerate them—this will enhance the taste! The frosting can also be prepared up to 3 days ahead; store it in an airtight container in the fridge, and just before serving, give it a quick stir to bring it back to a creamy consistency. When you’re ready to impress your guests, simply frost the cooled cake, and you’ll enjoy a fabulous dessert with less last-minute fuss.
Chocolate Layer Cake Recipe FAQs
How do I know if my ingredients are ripe or suitable?
Absolutely! For this decadent chocolate layer cake, use fresh ingredients. All-purpose flour should be free of lumps and stored in a cool, dry place. Check that your cocoa powder is dark and has no clumps. For eggs, ensure they are fresh by checking the expiration date. Buttermilk should have a pleasant smell and be creamy; if it smells off, it’s better to discard it.
How should I store my cake after baking?
Very! After you’ve baked and cooled your chocolate layer cake, cover it with plastic wrap or place it under a cake dome to store at room temperature for up to 3 days. If there’s any leftover, you can refrigerate it for up to a week. Just remember to wrap it well to keep that delicious moisture locked in!
Can I freeze the chocolate layer cake?
Absolutely! To freeze your chocolate layer cake, slice it into individual pieces. Wrap each slice tightly in plastic wrap and place them in an airtight container. This way, they’ll stay fresh for up to 3 months. When you’re ready to enjoy, simply thaw each slice in the refrigerator overnight and bring it to room temperature before serving to get the best taste.
What if the cake comes out too dry?
Oh no! If your cake turns out dry, it could be due to overbaking or overmixing. To ensure a moist cake, always check for doneness using a toothpick around the 30-minute mark. If it comes out clean, it’s ready; if not, check in 1-2 minute intervals. Next time, keep an eye on the mixing; only mix until just combined to maintain that luscious texture.
Are there any dietary considerations for pets or allergies?
Absolutely! While this chocolate layer cake is a delightful treat for humans, keep it away from pets, especially dogs, as chocolate is toxic to them. For allergies, make sure to identify any potential allergens in your ingredients, such as gluten from the flour or lactose from dairy. You can easily make this cake gluten-free by using a suitable flour blend, and for those with dairy sensitivities, almond milk and a vinegar substitute can work wonders!
Decadent Chocolate Layer Cake for Sweet Celebrations
Ingredients
Equipment
Method
- Preheat your oven to 350°F (175°C) and grease and flour two 9-inch round cake pans.
- In a large mixing bowl, whisk together all-purpose flour, granulated sugar, cocoa powder, baking soda, and baking powder until well combined.
- In a separate bowl, mix buttermilk, vegetable oil, eggs, and vanilla extract until smooth.
- Pour the wet mixture into the dry ingredients and stir gently until just combined.
- Gradually add hot brewed coffee into the batter, mixing at low speed until incorporated.
- Divide the batter evenly between the prepared pans and bake for 30-35 minutes, or until a toothpick comes out clean.
- Allow the cakes to cool in the pans for 15 minutes before transferring to a wire rack to cool completely.
- Once cool, frost between the layers and on top and sides of the cake.
Leave a Reply