
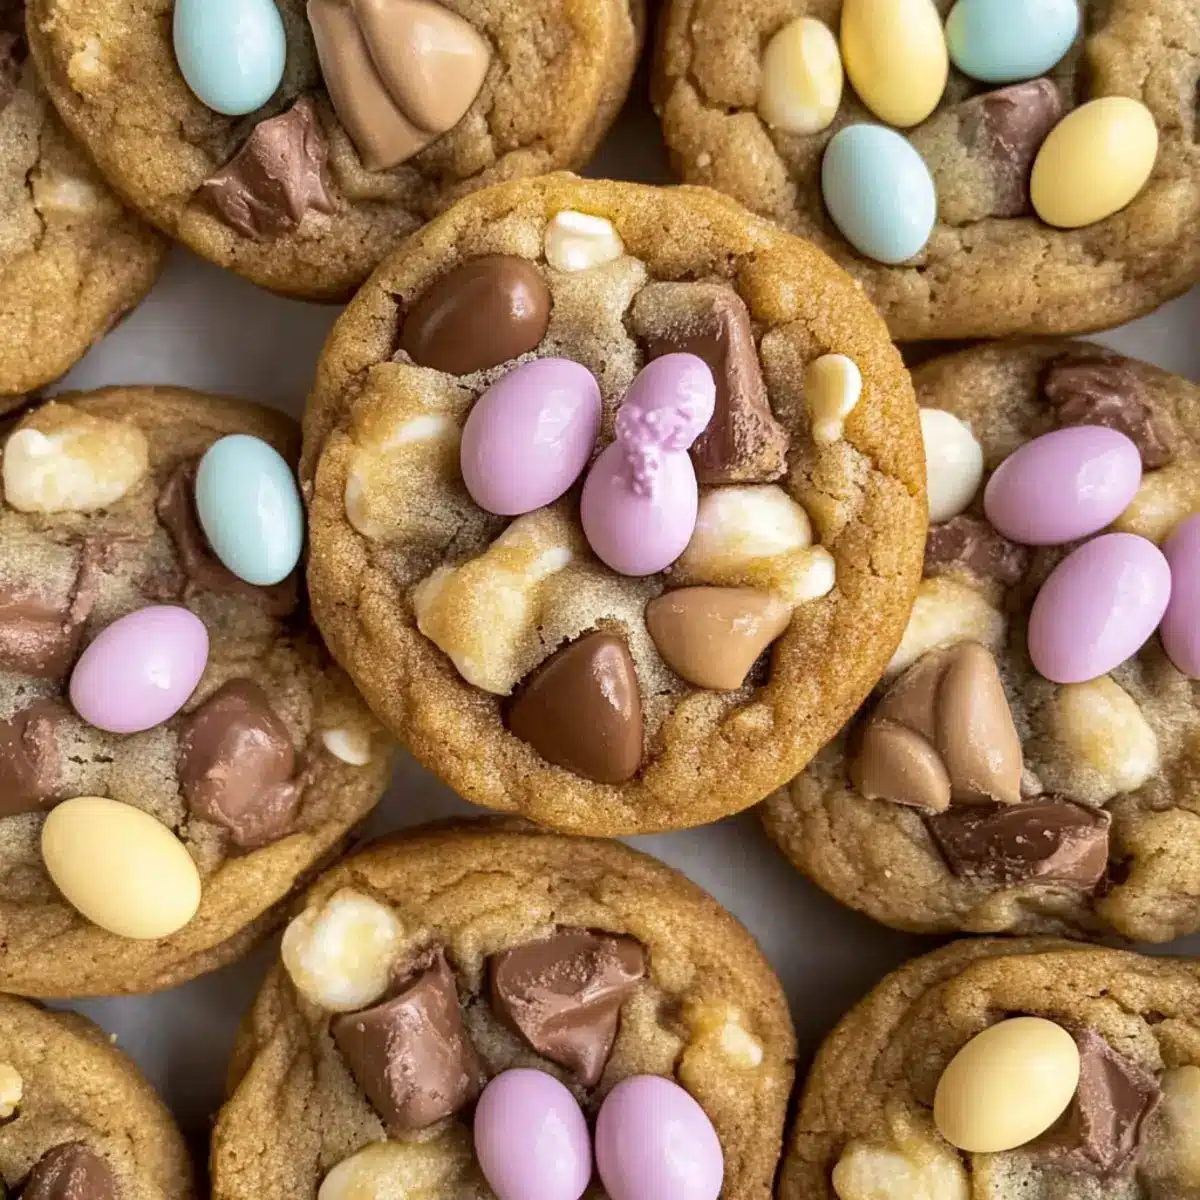
As I whisked together the ingredients for my latest creation, the sweet aroma of melting chocolate filled the air, instantly transporting me to cozy Easter mornings. These Easter Chocolate Cookies, soft and chewy, are a delightful blend of rich chocolate chunks and festive decorations like Malteser Bunnies and Mini Eggs. The best part? This one-bowl recipe means minimal cleanup and maximum enjoyment—perfect for those of us who crave a quick and satisfying treat during the holiday hustle. Imagine serving these cookies warm, their gooey centers beckoning for a cup of coffee or tea on the side. What other surprises await in this charming holiday batch?

Why Are These Easter Chocolate Cookies Special?
Simplicity makes this recipe perfect for busy bakers. You only need one bowl to whip up a batch of these delightful cookies! Festive decorations like Malteser Bunnies and Mini Eggs add a vibrant touch, making them a showstopper at any Easter gathering. Rich chocolate chunks melt in your mouth, offering a decadent experience with every bite. Versatile options are available; swap in your favorite candies or nuts to customize these to your taste. Treat yourself and your loved ones to this easy recipe that’s sure to impress—it’s the ultimate way to celebrate the holiday!
Easter Chocolate Cookies Ingredients
Here’s what you need to create these delightful treats!
For the Cookie Dough
- Unsalted Butter – Adds richness and moisture. Substitute with margarine for a dairy-free option.
- White Caster Sugar – Provides sweetness and helps create a crispy exterior. Granulated sugar can be used in its place.
- Light Brown Sugar – Contributes moisture and a slight caramel flavor. Dark brown sugar can enhance the flavor further.
- Egg – Binds ingredients for structure and moisture. Use a flax egg for a vegan alternative.
- Egg Yolk – Enhances richness and moisture. Omit for a lighter cookie if desired.
- Vanilla Extract – Adds flavor depth. Use almond extract as a possible substitute.
- Self-Raising Flour – Provides structure and leavening. All-purpose flour plus baking powder can be a substitute.
- Salt – Balances sweetness and enhances flavor. Omit if using salted butter.
- Chocolate Chunks – Adds richness and texture. A mix of milk and dark chocolate can offer flavor variation.
For the Topping
- Mini Malteser Bunnies – Decorative and flavorful toppings. Use any small chocolate for a different look.
- Mini Eggs – Offers a crunchy texture and color contrast. Could be replaced with any Easter-themed candy.
Now that you have all your ingredients ready, let’s dive into creating these scrumptious Easter Chocolate Cookies!
Step‑by‑Step Instructions for Easter Chocolate Cookies
Step 1: Prepare Dough
Start by melting 150g of unsalted butter in a microwave-safe bowl for about 30-40 seconds until fully melted. Mix in 100g of white caster sugar and 75g of light brown sugar until well combined. Then, add one egg, one egg yolk, and 1 teaspoon of vanilla extract, stirring until the mixture is smooth and glossy.
Step 2: Combine Dry Ingredients
Incorporate 200g of self-raising flour and a pinch of salt into the wet mixture. Gently fold the flour using a spatula until a soft dough begins to form. Next, stir in 150g of chocolate chunks, ensuring they are evenly distributed throughout your Easter Chocolate Cookies dough for bursts of chocolate in every bite.
Step 3: Chill Dough
Cover the bowl with clingfilm and chill your dough in the refrigerator for at least 5 hours or preferably overnight. This chilling step enhances the flavor and texture of your cookies, allowing the sugars to dissolve and the dough to firm up, which is crucial for creating those perfectly chewy cookies.
Step 4: Preheat Oven
Preheat your oven to 180°C for fan settings or 200°C for conventional settings. Line a baking tray with parchment paper, ensuring an easy release for your cookies once baked. It’s important to prepare your tray while the dough is chilling, so everything is ready for baking.
Step 5: Shape Cookies
After 30 minutes of letting the chilled dough sit at room temperature, scoop heaped tablespoons of dough and roll them into balls. Place the dough balls spaced out on the prepared baking tray, leaving ample room for them to spread while baking into those irresistible Easter Chocolate Cookies.
Step 6: Bake
Pop the tray into the preheated oven and bake for about 10 minutes until the edges are pale golden but the centers still look slightly underbaked. Keeping the centers soft will give your Easter Chocolate Cookies that delightful chewy texture that melts in your mouth.
Step 7: Decorate
As soon as you take the cookies out of the oven, gently press Mini Malteser Bunnies and Mini Eggs into the warm cookies. The warmth will help these toppings slightly melt into the cookie, creating a beautiful and festive presentation for your Easter Chocolate Cookies.
Step 8: Cool
Allow the cookies to firm up on the baking tray for about 20 minutes before transferring them to a wire rack. This resting period is essential for achieving the perfect soft and chewy center while making sure they don’t crumble when handled. Enjoy the tempting aroma as you wait!
Make Ahead Options
These Easter Chocolate Cookies are perfect for busy home cooks looking to save time during the holiday rush! You can prepare the cookie dough up to 24 hours in advance by chilling it in the refrigerator. Simply cover the bowl with clingfilm after mixing, allowing the flavors to develop beautifully. If you want, you can also shape the cookie balls and freeze them—for up to 3 months—which makes for a stress-free baking experience later on. When you’re ready to bake, just place the frozen dough on a lined tray and add a couple of minutes to the baking time. By preparing ahead, you’ll enjoy fresh, soft, and chewy cookies with minimal effort right when you need them!
What to Serve with Easter Chocolate Cookies
Create the perfect spread for indulging in these festive delights and elevate your Easter celebration!
-
Vanilla Ice Cream: A scoop of creamy ice cream pairs beautifully with warm cookies, enhancing that melt-in-your-mouth experience. The coolness of the ice cream contrasts deliciously with the chocolate warmth.
-
Fresh Berries: A side of juicy strawberries or raspberries adds a refreshing tang, cutting through the sweetness of the cookies and providing a vibrant splash of color.
-
Coconut Macaroons: These chewy, sweet treats complement the texture of the cookies while adding an additional depth of flavor, allowing for a delightful contrast on your dessert platter.
-
Espresso or Coffee: Sipping a rich espresso or your favorite coffee beverage alongside the cookies makes for a comforting and indulgent pairing, accentuating the chocolate flavors perfectly.
-
Milkshakes: Whipped-up milkshakes can add a fun, nostalgic touch to your dessert table, blending the flavors of chocolate with a creamy texture that everyone will love.
-
Carrot Cake: Serve alongside a slice of moist carrot cake for a delightful Easter-themed complement that balances the rich chocolate with spices and warmth.
-
Homemade Lemonade: A refreshing glass of homemade lemonade offers a sweet-tart contrast and a bright note to cleanse the palate between bites of the rich cookies.
-
Chocolate Fondue: For a fun, interactive dessert option, serve with a pot of warm chocolate fondue where guests can dip everything from fruits to cookie pieces for an extravagant treat.
How to Store and Freeze Easter Chocolate Cookies
Room Temperature: Store cookies in a sealed container at room temperature for up to 5 days to maintain their soft and chewy texture.
Fridge: If you prefer them chilled, they can be kept in the fridge for up to 7 days. Just remember to let them sit at room temperature for a few minutes before enjoying!
Freezer: For longer storage, freeze unbaked cookie dough balls for up to 3 months. When ready to bake, just pop them straight into the oven from frozen, adding an extra minute or two to the baking time.
Reheating: To enjoy your cookies warm, simply microwave for 10-15 seconds; they’ll retain that fresh-baked feel, perfect for indulging in your Easter Chocolate Cookies!
Expert Tips for Easter Chocolate Cookies
-
Chill Dough Properly: Make sure to chill the dough for at least 5 hours or overnight; this step is crucial for enhancing the flavor and achieving the perfect chewy texture.
-
Avoid Overbaking: Keep an eye on your cookies while baking; they should still look slightly underbaked in the center. They will continue to firm up while cooling.
-
Use Quality Chocolate: For the best-tasting Easter Chocolate Cookies, opt for high-quality chocolate chunks. This makes a significant difference in flavor and richness.
-
Spacing is Key: When shaping and placing the dough on the tray, ensure enough space between each cookie. They will spread during baking, and you don’t want them to merge.
-
Experiment with Toppings: Feel free to customize your Easter Chocolate Cookies by swapping Mini Malteser Bunnies or Mini Eggs for your favorite candies or chocolates for a personal touch.
Easter Chocolate Cookies Variations
Feel free to let your creativity shine with these delightful twists on the classic recipe, making every batch uniquely yours!
-
Dairy-Free: Substitute unsalted butter with margarine or coconut oil for a delicious dairy-free option. You won’t lose any richness while embracing those chewy textures.
-
Nutty Delight: Add 1/2 cup of chopped nuts like walnuts or pecans for an added crunch. This introduces a lovely, earthy flavor that pairs beautifully with chocolate.
-
Spicy Kick: Mix in a pinch of cayenne pepper or chili powder to elevate the flavor with a gentle heat. It’s a daring yet delectable twist that will surprise your taste buds!
-
Oatmeal Boost: Incorporate 1/2 cup of rolled oats into the dough for extra texture and fiber. The result is a heartier cookie that still maintains that chewy softness.
-
Fruit Fusion: Fold in 1/2 cup of dried fruits like cranberries or cherries for a burst of natural sweetness. They add a lovely color contrast and a fruity tang to each bite.
-
Fruity Chocolate: Opt for white chocolate chunks instead of dark chocolate for a sweeter, creamier cookie. This variation will create a lovely contrast with the cookies’ richness.
-
Thematic Toppings: Swap out Mini Eggs and Mini Malteser Bunnies for festive seasonal candies like jelly beans or pastel-colored chocolate-covered treats. Each batch can reflect the joy of Easter!
-
No Bake Treats: For a fun twist, create no-bake cookie bars using the same dough, pressing it into a lined pan and refrigerating until set. This establishes a delightful sliceable treat that’s just as delicious!
Just like how these cookies pair wonderfully with a cup of coffee, expanding your creations can lead to delightful surprises. For more chocolate inspiration, don’t forget to check out our Peanut Butter Chocolate and Sokolatina Chocolate Custard recipes. Explore the possibilities and find your favorite versions!

Easter Chocolate Cookies Recipe FAQs
What kind of chocolate should I use for the cookies?
Absolutely! For the best flavor, I recommend using high-quality chocolate chunks. A mix of milk and dark chocolate offers a delightful contrast and rich taste, making each bite irresistibly satisfying. For a fun twist, try using flavored chocolates like caramel or orange-flavored for a unique touch!
How should I store my Easter Chocolate Cookies?
Store your cookies in a sealed container at room temperature for up to 5 days to keep them soft and chewy. They can also be kept in the fridge for up to 7 days, but let them sit at room temperature for a few minutes before enjoying for that fresh-baked taste!
Can I freeze the cookie dough?
Yes, you can! For longer storage, freeze unbaked cookie dough balls for up to 3 months. To do this, scoop the dough onto a baking tray lined with parchment paper and freeze until solid. Then, transfer the cookie balls to a freezer bag. When you’re ready to bake, you can pop them straight from the freezer into the oven; just add an extra minute or two to the baking time.
How can I make my cookies chewier?
Very good question! To ensure your Easter Chocolate Cookies are wonderfully chewy, avoid overbaking. They should still look slightly underbaked in the center when you pull them out of the oven. Also, chilling the dough for at least 5 hours helps improve the texture, allowing flavors to meld beautifully and creating that perfect chewy consistency.
What if my cookies spread too much while baking?
If your cookies spread more than expected, it may be due to the dough being too warm. Ensure the dough is well-chilled before baking. If you find they spread excessively, try adding a bit more flour to the dough next time, or space them further apart on the baking tray. This will help them maintain their shape better during baking.
Are there any allergy concerns with the ingredients?
Yes, your Easter Chocolate Cookies contain common allergens like eggs, milk (from the chocolate), and wheat. If you’re serving these to someone with allergies, you can swap the egg for a flax egg to make them vegan. For gluten-free options, use a gluten-free flour blend instead of self-raising flour. And always check the chocolate for any added allergens.

Easter Chocolate Cookies Soft, Chewy, and Irresistibly Festive
Ingredients
Equipment
Method
- Start by melting 150g of unsalted butter in a microwave-safe bowl for about 30-40 seconds until fully melted.
- Mix in 100g of white caster sugar and 75g of light brown sugar until well combined.
- Add one egg, one egg yolk, and 1 teaspoon of vanilla extract, stirring until the mixture is smooth and glossy.
- Incorporate 200g of self-raising flour and a pinch of salt into the wet mixture.
- Gently fold the flour using a spatula until a soft dough begins to form.
- Stir in 150g of chocolate chunks, ensuring they are evenly distributed throughout your dough.
- Cover the bowl with clingfilm and chill your dough in the refrigerator for at least 5 hours or preferably overnight.
- Preheat your oven to 180°C for fan settings or 200°C for conventional settings.
- Line a baking tray with parchment paper.
- After 30 minutes of letting the chilled dough sit at room temperature, scoop heaped tablespoons of dough and roll them into balls.
- Place the dough balls spaced out on the prepared baking tray.
- Bake for about 10 minutes until the edges are pale golden but the centers still look slightly underbaked.
- Gently press Mini Malteser Bunnies and Mini Eggs into the warm cookies.
- Allow the cookies to firm up on the baking tray for about 20 minutes before transferring them to a wire rack.
Leave a Reply