
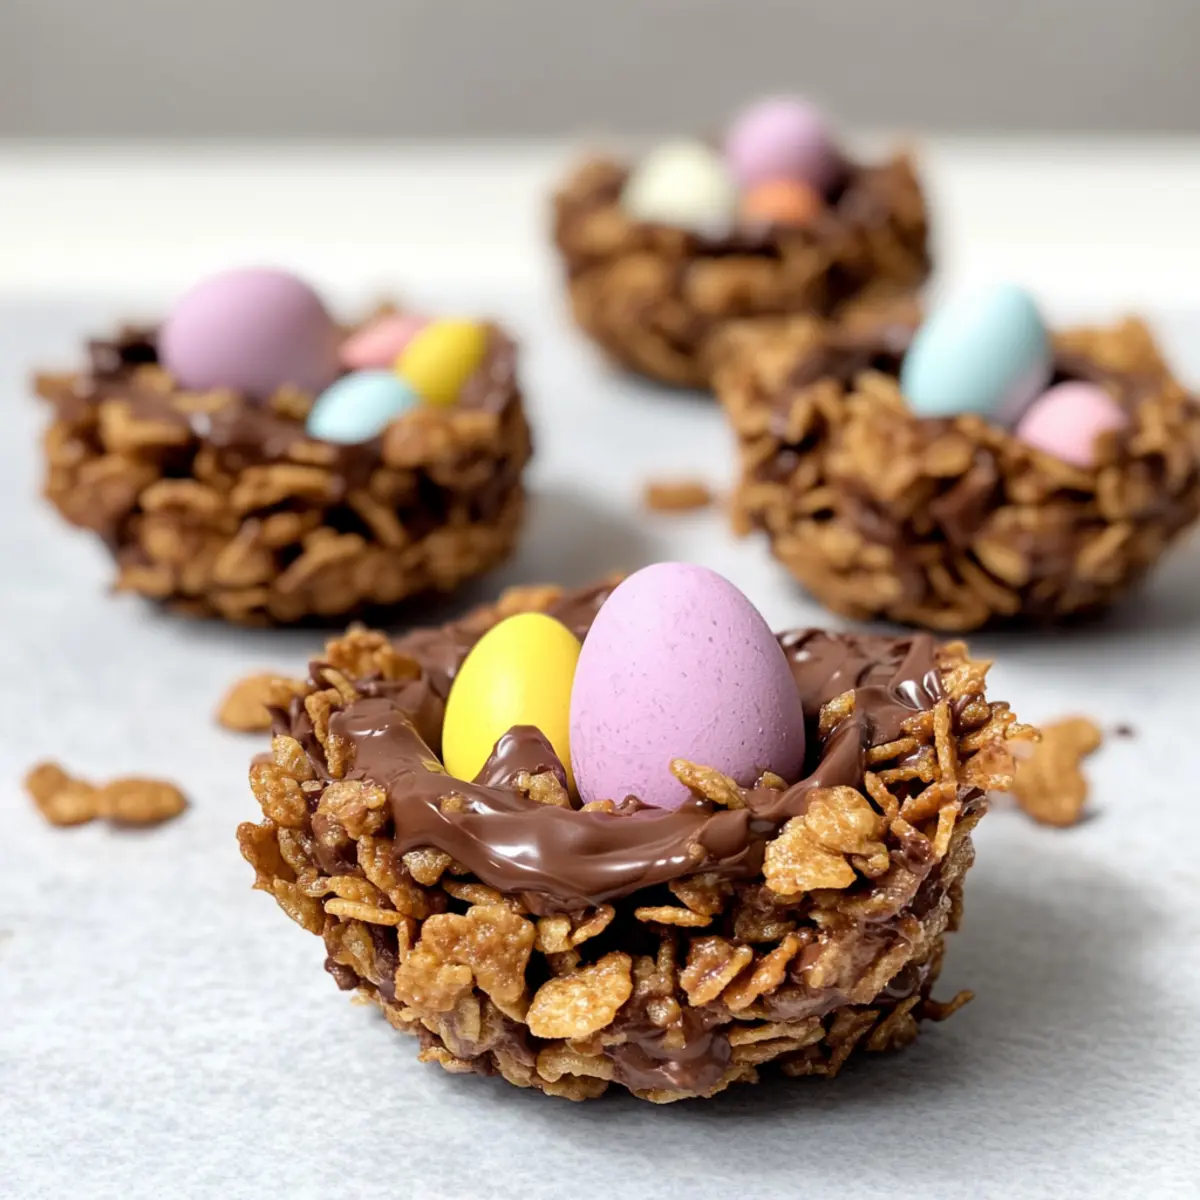
While rummaging through memories of childhood Easters, the sight of delightful Chocolate Easter Nests brings a smile to my face. These easy, no-bake treats are not just a nostalgic reminder; they’re also a perfect way to gather family around the kitchen. With just a few simple ingredients and quick prep, you can whip up a batch that’s sure to become a crowd favorite. The kids will love getting their hands sticky while creating these fun nests, making them an engaging activity for everyone. Plus, with options for gluten-free and vegan-friendly ingredients, you can cater to various dietary needs without sacrificing taste. So, are you ready to create some delicious memories this Easter?

Why Make Chocolate Easter Nests?
Simplicity and Fun: These no-bake treats require just a handful of ingredients, making them perfect for busy families eager to get into the Easter spirit without the fuss.
Kid-Friendly Activity: Involve the little ones and let them get hands-on with creating these nests, turning snack time into delightful bonding moments.
Customizable Options: Whether you prefer dairy-free margarine or vegan chocolate, this recipe can easily adjust to suit all dietary preferences, ensuring everyone can partake in the fun.
Gorgeous Presentation: The finished nests are not just delicious—they’re visually appealing too, making them a colorful addition to any Easter table. Consider pairing them with other festive treats like Easter Pineapple Rum for a spectacular dessert spread!
Chocolate Easter Nests Ingredients
For the Nests
• Cornflakes – Provides structure and crunch; can use Rice Krispies or shredded wheat for a different texture.
• Milk Chocolate – Main flavor component; sweet and creamy, but dark chocolate can be used for a richer taste.
• Block Margarine or Butter – Helps to thin out the chocolate for easier coating; opt for block margarine, not soft spread.
• Golden Syrup – Adds sweetness and aids in coating the cereal; maple syrup can be a tasty substitute, though it alters the flavor slightly.
For Decoration
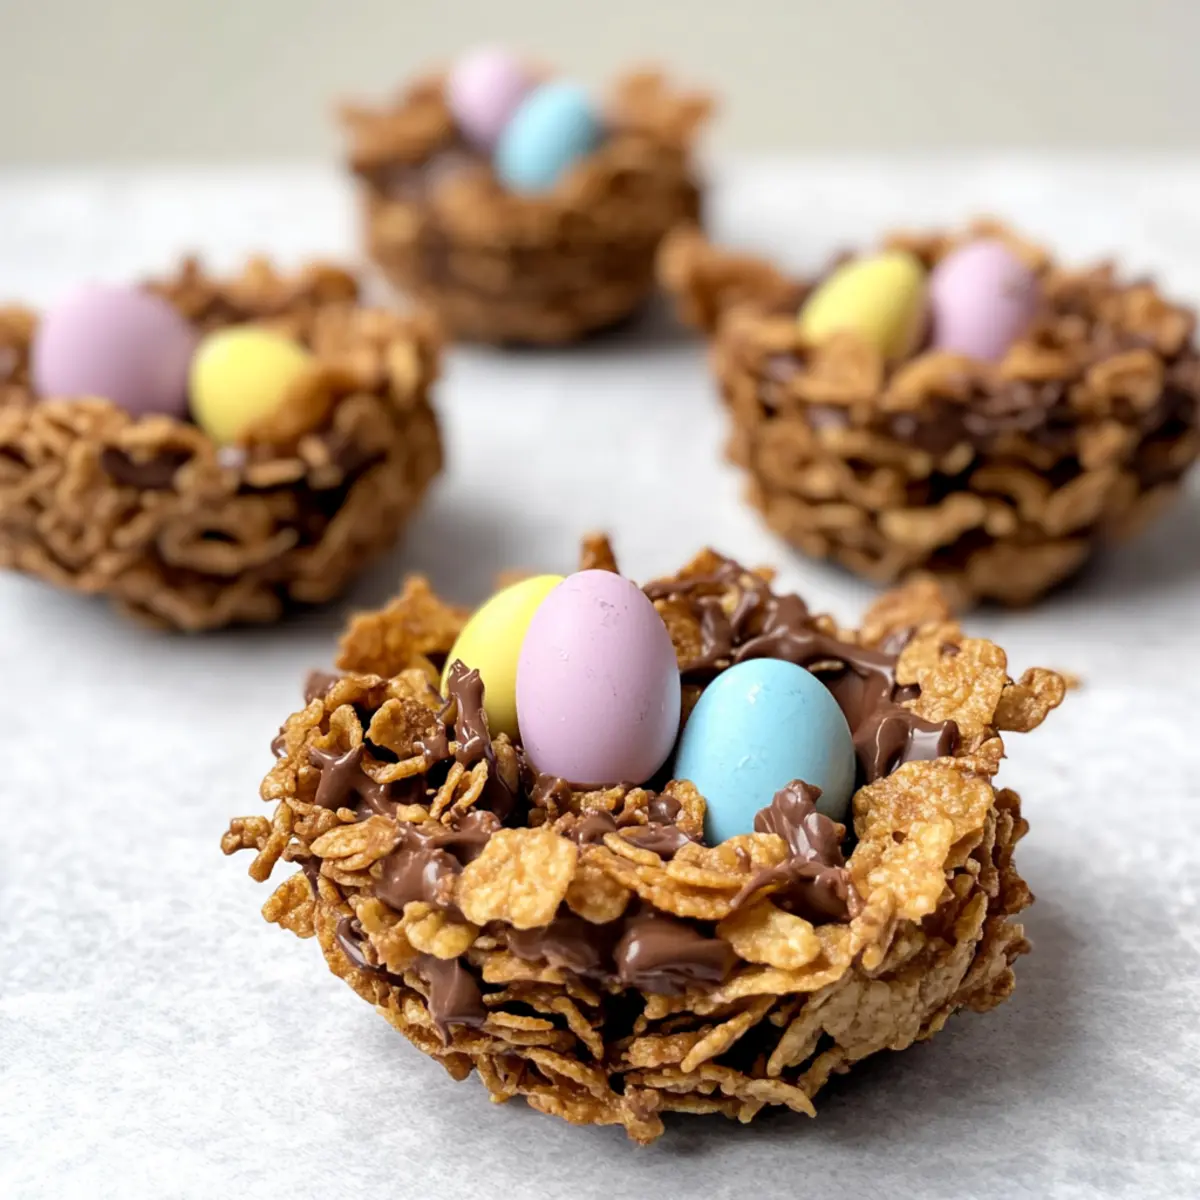
• Chocolate Mini Eggs – Decorative topping that adds festivity and sweetness to your Chocolate Easter Nests.
Now you’re all set to gather these delightful ingredients and make some sweet, crunchy memories this Easter!
Step‑by‑Step Instructions for Chocolate Easter Nests
Step 1: Prepare the Tray
Start by lightly greasing a 12-hole bun tray with a little margarine to prevent sticking. This will ensure your Chocolate Easter Nests can be easily removed after they set. Set the tray aside while you gather and melt your ingredients.
Step 2: Melt the Chocolate Mixture
In a small saucepan, combine the milk chocolate, block margarine, and golden syrup over low heat. Stir continuously for about 5-7 minutes, watching for the mixture to become smooth and glossy without burning. Remove from heat once fully melted and set aside to cool slightly.
Step 3: Combine with Cornflakes
In a large mixing bowl, add the cornflakes. Carefully pour the melted chocolate mixture over the cornflakes, using a spatula to gently fold them together until all the cereal is evenly coated. Be cautious not to crush the cornflakes to maintain that delightful crunch in your Chocolate Easter Nests.
Step 4: Form the Nests
Spoon the chocolate-coated cornflakes into the greased bun tray. Use the back of a spoon or your fingers to gently press the mixture down and create an indent in the center of each nest. Aim for even shapes to help with presentation and provide a good structure for the mini eggs.
Step 5: Add the Mini Eggs
While the chocolate mixture is still warm, gently press a few chocolate mini eggs into the center of each nest, allowing them to sink slightly. This adds a festive touch to your Chocolate Easter Nests and creates a colorful display that’s sure to delight.
Step 6: Chill the Nests
Place the tray in the refrigerator and chill for 1-2 hours until the chocolate has fully set. This waiting period is crucial for achieving the perfect firm texture, allowing you to enjoy those crunchy and chocolatey flavors in your Chocolate Easter Nests.
Step 7: Serve and Enjoy
Once set, remove the nests from the fridge shortly before serving to allow them to soften slightly for an enjoyable bite. Carefully pop each Chocolate Easter Nest out of the tray and arrange them on a platter, ready to share with family and friends.
Chocolate Easter Nests Variations
Mixing things up can make your delightful nests even more exciting. Here are some fun variations to consider!
-
Dairy-Free: Swap out milk chocolate for a dairy-free chocolate to cater to lactose-intolerant friends. You can still achieve that rich, comforting flavor without compromise.
-
Fruit-Infused: Add dried fruits like raisins or cranberries to the mix for a chewy burst of flavor. The sweetness adds a lovely contrast to the crunchy texture of the nests.
-
Nutty Twist: If you’re not allergic, fold in crushed nuts such as almonds or hazelnuts for a delightful crunch. They not only elevate the taste but also add healthy fats!
-
Chocomint: Incorporate a few drops of peppermint extract into the melted chocolate for a refreshing twist. Imagine the delightful aroma wafting through your kitchen as you create these nests!
-
Colorful Sprinkles: Once the nests have set, top them with colorful sprinkles for a festive look, making them even more appealing to kids—and adults alike.
-
Peanut Butter Bliss: Stir in a couple of tablespoons of peanut butter into the chocolate mixture for a decadent flavor twist. If you love the combo of chocolate and peanut butter, this variation will be a crowd-pleaser!
-
Festive Coconut: Mix in desiccated coconut for a tropical flair. Not only does it add a delightful chewiness, but it also gets you in the mood for a sunny Easter celebration.
-
Chocolate Milk Treat: If you’re a chocolate lover, pair these nests with a glass of Homemade Chocolate Milk for an indulgent treat. The combination is sure to send everyone into chocolate heaven!
Feel free to pick and choose from these variations, or even mix a few together! These Chocolate Easter Nests are all about creating a delightful experience—both in taste and in fun!
What to Serve with Chocolate Easter Nests?
Creating a memorable Easter dessert experience is all about pairing flavors and textures that delight the senses.
-
Fresh Berry Compote: A vibrant mix of strawberries and blueberries adds a refreshing contrast to the rich chocolate, brightening up every bite. The tartness beautifully complements the sweetness of the nests.
-
Whipped Coconut Cream: This fluffy topping offers a light and airy texture that enhances the chocolate nests’ crunch. It’s a dairy-free option that pairs perfectly for those with dietary restrictions.
-
Mini Fruit Kebabs: Skewers of colorful fruits like kiwi, pineapple, and grapes not only look festive but also provide a juicy, refreshing counterpoint to the crunchy nests.
-
Chocolate Milkshakes: Creamy and indulgent, a chocolate milkshake complements the chocolate theme while cooling off anyone who enjoys a chilled drink alongside this festive treat.
-
Easter-themed Cupcakes: These can bring even more joy to the table. Fluffy vanilla or chocolate cupcakes topped with pastel frostings create a joyful visual feast alongside the nests.
-
Pastel-colored Spritz Cookies: If you’re looking for something crunchy, these spritz cookies introduce delightful different flavors while adding to the sweet Easter theme.
-
Herbal Iced Tea: A refreshing, unsweetened iced tea infused with mint or lemon balances out the sweetness of the nests. It’s refreshing and suitable for guests of all ages.
-
Carrot Cake Squares: Soft, decadent, and spiced, these squares bring in a wonderful Easter theme while providing contrast to the crunchy nests’ texture.
Enhancing your dessert table with these delightful options will have everyone smiling this Easter!
Expert Tips for Chocolate Easter Nests
- Gentle Melting: Use low heat to melt the chocolate to ensure a smooth, glossy mixture and prevent graininess in your Chocolate Easter Nests.
- Quick Action: Work swiftly after mixing the cornflakes to avoid the chocolate setting too quickly, which can make forming nests challenging.
- Keep Crunchy: Be careful not to crush the cornflakes while mixing; maintaining their shape ensures a delightful crunch in each bite.
- Allergen Awareness: Always check ingredients for allergens if serving to guests with dietary restrictions to ensure your Chocolate Easter Nests are safe for everyone.
- Decorative Touch: Feel free to experiment with other toppings, like colorful sprinkles or coconut, to add personal flair to your nests!
Make Ahead Options
These delightful Chocolate Easter Nests are a fantastic choice for meal prep! You can prepare the chocolate mixture and coat the cornflakes up to 24 hours in advance. To do this, melt the chocolate with margarine and golden syrup as instructed, then fold in the cornflakes. Once combined, pack the mixture into the greased bun tray but do not add the mini eggs yet; cover the tray tightly and refrigerate. This method maintains quality, ensuring they remain crisp and delicious. When you’re ready to serve, simply press in the mini eggs and chill for an additional hour to set, making for an effortless and festive treat that saves you time on busy days!
How to Store and Freeze Chocolate Easter Nests
Airtight Container: Store your Chocolate Easter Nests in an airtight container at room temperature for up to 5 days to maintain their delightful crunch.
Refrigeration: On warmer days, you can refrigerate the nests to keep them firm. Allow them to sit at room temperature for about 10-15 minutes before serving for the best texture.
Freezing: If you want to make them ahead of time, freeze your Chocolate Easter Nests for up to 3 months. Place them in a single layer on a baking sheet until frozen, then transfer them to an airtight freezer bag.
Thawing: When ready to enjoy, simply remove the nests from the freezer and thaw in the fridge or at room temperature. Enjoy your sweet treats!

Chocolate Easter Nests Recipe FAQs
How do I select the right cornflakes for Chocolate Easter Nests?
Absolutely! Look for cornflakes that are fresh and crispy. Check the package for any dark spots or stale air; ideally, the flakes should be lightly golden and crunch when you bite into them. A fresh batch will ensure a delightful texture in your nests!
What’s the best way to store Chocolate Easter Nests?
Store your Chocolate Easter Nests in an airtight container at room temperature for up to 5 days. If the weather is warm, refrigerate them to keep their firmness. Just remember to let them sit out for about 10-15 minutes before serving to regain that perfect, melt-in-your-mouth texture.
Can I freeze Chocolate Easter Nests?
Yes, you can! Place your Chocolate Easter Nests in a single layer on a baking sheet until they freeze solid, then transfer them to an airtight freezer bag for up to 3 months. When you’re ready to enjoy them, thaw them in the fridge, or at room temperature for a delightful treat!
What should I do if my chocolate mixture is grainy?
Very! If your chocolate becomes grainy, it could be due to high heat or moisture. To remedy this, gently melt a little additional butter or margarine, and stir it into the mixture while it’s still warm. If you’re ever in doubt, always melt chocolate over low heat and stir continuously to keep it smooth and silky.
Are Chocolate Easter Nests suitable for those with dietary restrictions?
Yes, indeed! This recipe is highly adaptable. You can use dairy-free margarine and vegan chocolate for a dairy-free version, ensuring everyone can enjoy these tasty treats. Just double-check that all your ingredients are free from allergies, especially if serving to sensitive individuals!
Can I customize the toppings on my Chocolate Easter Nests?
The more the merrier! Feel free to add your favorite toppings like colorful sprinkles or desiccated coconut, or even substitute mini eggs with other sweets. This makes your nests even more festive and fun, perfect for your Easter celebrations!
Delightful Chocolate Easter Nests for Sweet Spring Celebrations
Ingredients
Equipment
Method
- Lightly grease a 12-hole bun tray with margarine and set aside.
- Melt milk chocolate, block margarine, and golden syrup in a saucepan over low heat, stirring for 5-7 minutes until smooth.
- In a large bowl, combine cornflakes and pour the melted chocolate mixture over them. Fold gently until evenly coated.
- Spoon the mixture into the bun tray, pressing down gently to form nests.
- Press chocolate mini eggs into the center of each nest while warm.
- Refrigerate for 1-2 hours until chocolate is fully set.
- Remove from fridge, allow to soften slightly, and serve.
Leave a Reply